Estimated reading time: 13 minutes

In a previous post, I walked through deploying a dedicated Script Host to handle scripts or workflows with complex dependencies and higher resource demands. That design relied on a WinRM HTTPS listener secured with an internally signed SSL certificate. Maintaining that security posture means renewing the certificate before expiration. Although the process is similar to the original implementation, we must exercise care to ensure the correct certificate is validated, replaced, and properly bound to the listener.
As is often the case in the world of automation, there are frequently multiple paths to reach the desired outcome. Feel free to employ your preferred techniques for certain steps, especially if you need to navigate around specific security constraints. The instructions provided here are intended as a flexible framework and should be adapted to align with the unique requirements and security policies of your specific environment.
Before You Begin
This article assumes the following:
- A Windows Server has already been deployed for use as a script host.
- The user has adequate permissions to fully manage the Windows server, specifically to manage the certificate store and execute elevated commands in PowerShell.
- The user has access to the Certificate Services portal (or similar internal Certificate Authority), with adequate permissions to generate an internal certificate.
- The OpenSSL package is already installed on a Linux endpoint and the user has appropriate permissions to use the system, including upload/download files using a Secure Copy Protocol (SCP) client.
Generate a New Certificate
Having Déjà vu?
The steps below were performed when the Script Host was deployed in the previous article. If you already have a CSR configuration file to reference, skip to step 4.5.
- Launch an SSH Terminal session to a server with OpenSSL installed and authenticate as needed.
- Change directories to the /tmp parition (or another directory of choice) and create a new directory to work from:
cd \tmpmkdir certcd cert - Execute the command below to generate a new private key, which will be saved to the directory created above:
openssl genrsa -out privkey.key 2048 - Create a new configuration file which will be referenced to build the Certificate Signing Request (CSR):
- Execute the command below to open the vi text editor and stage with the desired file name:
vi csr_config.cfg - The vi text editor will open. Press the “INSERT” key to enter input mode.
- Paste the following lines into the vi text editor:
[ req ]
default_bits = 2048
default_keyfile = privkey.key
distinguished_name = req_distinguished_name
encrypt_key = no
prompt = no
string_mask = nombstr
req_extensions = v3_req

[ v3_req ]
basicConstraints = CA:FALSE
keyUsage = digitalSignature, keyEncipherment, dataEncipherment
extendedKeyUsage = serverAuth, clientAuth
subjectAltName = DNS:scripthostfqdn.local, DNS:scripthost

[ req_distinguished_name ]
countryName = (Country Code)
stateOrProvinceName = (State or Province)
localityName = (Locality)
organizationName = (Organization Name)
organizationalUnitName = (Organizational Unit Name)
commonName = scripthostfqdn.local - Save the file by pressing the “ESC” key, then type “:wq” and press the “Enter” key.
- Execute the command below to generate the CSR:
openssl req -new -key privkey.key -out script_host_csr.csr -config csr_config.cfg - Download the CSR file to your local workstation.
- Execute the command below to open the vi text editor and stage with the desired file name:
- Using a web browser of choice, navigate to the organization’s Certificate Services portal.
- Click on the “Request a Certificate” link.

- Click on the “Submit a certificate request…” link.

- Open the CSR file downloaded in previous steps using a text editor of choice. Copy and paste the entire contents of the file, including the START/END CERTIFICATE REQUEST sections into the “Base-64-Encoded certificate request” text box.

Note: Notice that the screenshot above contains the full contents of the CSR file. This is intentional for the sake of providing clear instruction and was exclusively generated for use in this post. You should never share your CSR nor certificate private key with anyone whom you do not trust. Ensure your CSR and certificate private key are stored in a secure location in accordance with your organization’s policy. - Click on the “Certificate Template” drop-down menu and select the appropriate certificate template menu item, then click on the “Submit” button.

- Once the “Certificate Issued” screen appears, tick the “Base 64 encoded” radio button, then click on the “Download Certificate” link. Save the file to your local workstation and upload a copy to the server with OpenSSL installed.
- Execute the command below to convert the certificate file with a .cer extension to a PKCS #12 (.p12) certificate which includes the private key:
openssl pkcs12 -export -in script_host_cert.cer -inkey privkey.key -name "scripthost" -out script_host_cert.p12 - If prompted to specify an “Export Password”, press the “Enter” key twice to bypass.
Note: It is good practice to specify an export password to partially mitigate the risk of the certificate being imported into an unauthorized server. If you specify a password for the certificate, ensure it is stored securely according to your organization’s policy. Given this is a lab environment, the export password was skipped. - Upload the PKCS #12 (.p12) certificate to the script host.
- Launch a VMware Remote Console (VMRC) or Remote Desktop Protocol (RDP) session to the script host and authenticate as the service account user.
- Right-click on the Start button, then click on the “Run” menu item to launch the “Run” dialog box. Type “mmc” and press the “Enter” key. Accept the User Account Control (UAC) prompt as needed for elevation.
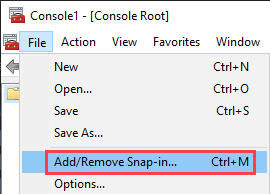
- The Microsoft Management Console (MMC) window will open. Click on the “File” menu item, located at the top-left corner of the window, then click on the “Add/Remove Snap-In” menu item.
- The “Add/Remove Snap-ins” box appears. Click on the “Certificates” menu item from the left-side pane, then click on the “Add” button.

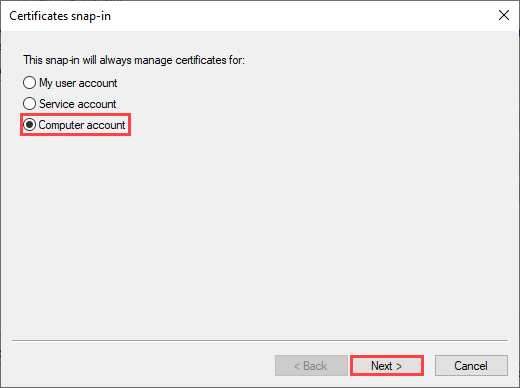
- The “Certificates snap-in” box appears. Tick the “Computer account” radio button, then click on the “Next” button.
- The “Local Computer” radio button should be ticked by default. Click on the “Finish” button, then click on the “OK” button to close the “Add/Remove Snap-Ins” window.

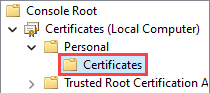
- Click on the chevron (“>”) button and navigate to the following: Console Root > Certificates > Personal. Note that if a “Certificates” item appears beneath the “Personal” object, select that item instead.
- Right-click on the “Personal” object (or “Certificates” object if it appears beneath the “Personal” object), hover your mouse over the “All Tasks” menu item, then click on the “Import” menu item.
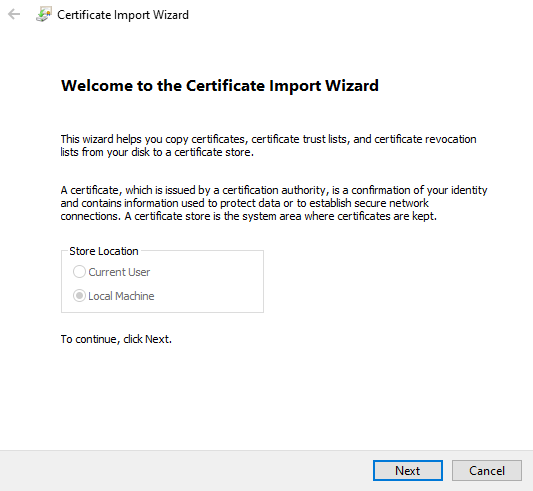
- The Certificate Import Wizard window opens. Click on the “Next” button, then click on the “Browse…” button and select the PKCS #12 (.p12) certificate uploaded in a previous step.
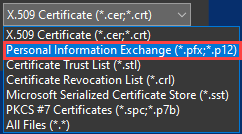
- The file browser window opens. Click on the file extension drop-down menu, located at the bottom-right corner of the page. Click on the “Personal Information Exchange…” menu item, navigate to the location of the certificate (.p12) file uploaded in a previous step, click to select the certificate, then click on the “Open” button. Finally, click on the “Next” button inside the “Certificate Import Wizard” window.
- Although prompted for an import password for the private key, you may skip this field.
- Tick the “Mark this key as exportable” check box, then click on the “Next” button.
- The “Place all certificates in the following store” radio button should be ticked by default, with the “Personal” certificate store selected. Click on the “Next” button, then click on the “Finish” button.
- After a moment, the “Certificate Import Wizard” dialog box should appear, stating “The import was successful”. Click on the “Ok” button to acknowledge.
- Notice that if the “Certificates” object was not present beneath the “Personal” object previously, it has since been created. Click on the “Certificates” object. Notice that the certificate has been imported to this certificate store.
- Double-click on the certificate. Once the “Certificate” box opens, click on the “Details” tab and scroll the attributes pane to the bottom of the list.
- Click on the “Thumbprint” value, which is near the bottom of the list. Copy the full thumbprint to your clipboard, or capture a screenshot for reference later.

- Right-click on the Start button, then click on the “Windows PowerShell (Admin)” menu item to launch an elevated PowerShell session. Accept the User Account Control (UAC) prompt as needed for elevation.
Replace the Certificate
Document the Existing HTTPS Listener
The snippet below will output specific attributes of the configured WinRM listener. Specifically, we are interested in the Transport (HTTPS), Port (5986), Enabled (True), and Certificate Thumbprint values. You can reference this information later to compare before/after values.
## Document the current WinRM HTTPS listener binding
Get-WSManInstance -ResourceURI winrm/config/Listener -SelectorSet @{ Address='*'; Transport='HTTPS' } |
  Select-Object Address, Transport, Port, Enabled, CertificateThumbprint, Hostname |
  Format-List *

<# Expected Output
Address               : *
Transport             : HTTPS
Port                  : 5986
Enabled               : true
CertificateThumbprint : b81b864241c89f932ad5353d16f6ac303d572184
Hostname              :
#>Define the New Certificate Thumbprint
Store the new certificate thumbprint as a variable so it can be referenced easily in future code snippets.
## Define new certificate thumbprint
$thumbprint = "b81b826281c25f912ad5773d36f8ac301d738542"Verify the New Certificate is Present and Usable for WinRM
The snippet below performs basic validation to ensure the new certificate is configured for use with Server Authentication and is compatible with TLS because it contains a private key.
## Validate the new certificate exists and is usable for WinRM
$cert = Get-ChildItem "Cert:\LocalMachine\My\$thumbprint" -ErrorAction Stop
if (-not $cert.HasPrivateKey) { throw "Certificate does not contain a private key." }
if ($cert.EnhancedKeyUsageList.FriendlyName -notcontains "Server Authentication") {
  throw "Certificate is missing the Server Authentication Enhanced Key Usage (EKU) value."
}Remove the Existing HTTPS Listener
## Remove the existing HTTPS listener
Get-ChildItem WSMan:\localhost\Listener |
  Where-Object { $_.Keys -match 'Transport=HTTPS' } |
Remove-Item -Recurse -ForceRe-Create the HTTPS Listener with the New Certificate Bound
## Create WinRM HTTPS listener with the new certificate
New-Item -Path WSMan:\localhost\Listener -Transport HTTPS -Address * `
-CertificateThumbprint $thumbprint -Force | Out-NullRestart WinRM
Restarting WinRM forces a reload of the listener configuration and is intended to prevent a scenario where the original certificate is still served due to cache.
## Restart WinRM to reload listener configuration
Restart-Service WinRMVerify the WinRM Configuration Reflects the New Certificate Thumbprint
Just like the first step, the snippet below will document specific attributes of the WinRM listener. Compare to the output from the first step. You should see that the certificate thumbprint has changed.
## Verify WinRM HTTPS listener is now configured with the new certificate thumbprint
Get-WSManInstance -ResourceURI winrm/config/Listener -SelectorSet @{ Address='*'; Transport='HTTPS' } |
  Select-Object Address, Transport, Port, Enabled, CertificateThumbprint, Hostname |
  Format-List *

<# Expected Output
Address               : *
Transport             : HTTPS
Port                  : 5986
Enabled               : true
CertificateThumbprint : b81b826281c25f912ad5773d36f8ac301d738542
Hostname              :
#>Validate the New Certificate is Presented by WinRM Over TLS
This final snippet is intended to prove that the new certificate thumbprint is being served when clients attempt to connect to the script host.
## Confirm the certificate actually presented by WinRM over TLS
$tcp = [Net.Sockets.TcpClient]::new("localhost",5986)
$ssl = [Net.Security.SslStream]::new($tcp.GetStream(), $false, ({ $true }))
$ssl.AuthenticateAsClient($env:COMPUTERNAME)
$served = [Security.Cryptography.X509Certificates.X509Certificate2]::new($ssl.RemoteCertificate)

$served | Select-Object Subject, Thumbprint, NotAfter | Format-List
$ssl.Dispose(); $tcp.Dispose()

<# Expected Output
Subject    : CN=scripthost.lab.local, OU=IT, O=My Homelab, L=Miami, S=FL, C=US
Thumbprint : b81b826281c25f912ad5773d36f8ac301d738542
NotAfter   : 2/22/2031 3:26:21 PM
#>Clean-up
Now that we have bound the new certificate to the WinRM listener, return to the MMC Certificates snap-in. Right-click on the original certificate, then click on the “Delete” menu item.