Estimated reading time: 14 minutes

If you manage a VMware environment of any meaningful size, you have probably been in this situation: a maintenance window is open, you have a list of VMs that need to be shut down and brought back up in a controlled sequence, and you’re doing it by hand through the vSphere/vCenter Client. One at a time. Watching a progress spinner. Checking back every few minutes. It’s one of those tasks that feels like it should have been automated years ago – and for most teams, it hasn’t been, not properly.
PowerCLI is the obvious starting point, but it carries baggage. Module installation, version compatibility, execution policy configuration, and a dependency footprint that isn’t always welcome on hardened or minimal systems. For something as conceptually simple as “shut these VMs down and turn them back on,” the setup cost often isn’t worth it – especially when you need the solution to work across jump hosts, automation runners, or environments where you’d rather not install anything at all.
In response, I wrote a PowerShell script with a little help from Artificial Intelligence (AI) – thanks, Claude! This script, Invoke-VMPowerOps.ps1, takes a different approach compared to what we have seen historically. It speaks directly to the vCenter REST API using nothing but native PowerShell. No additional modules nor prerequisites beyond PowerShell itself. Download the script into a directory, point it at a vCenter Server, hand it a text or CSV file of VM names, and it takes care of the rest: graceful shutdown with automatic escalation, concurrent execution throttled per host and per datastore, DRS-aware placement validation between power phases, dry-run simulation before you commit, and a full structured log of everything it did. This post walks through the features and important notes to effectively put it to work for you.
Get the Script
Download Invoke-VMPowerOps.ps1
Getting Started
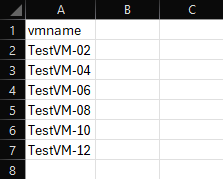
The script reads a CSV or plain-text file as an input, expecting one VM display name per line. Several common column headers (i.e., VM, VMName, etc.) are automatically skipped, so you can export a list directly from vCenter or a CMDB and reference it in the script without preprocessing.
The three core operation flags are -PowerDown (-pd), -PowerOn (-po), and -PowerCycle (-pc). You specify one core operation per run. If you do not specify an operation flag, the script prompts you interactively with a numbered menu. Everything else such as vCenter server, credentials, output format, etc. can be supplied as arguments or entered at runtime. See the example below:
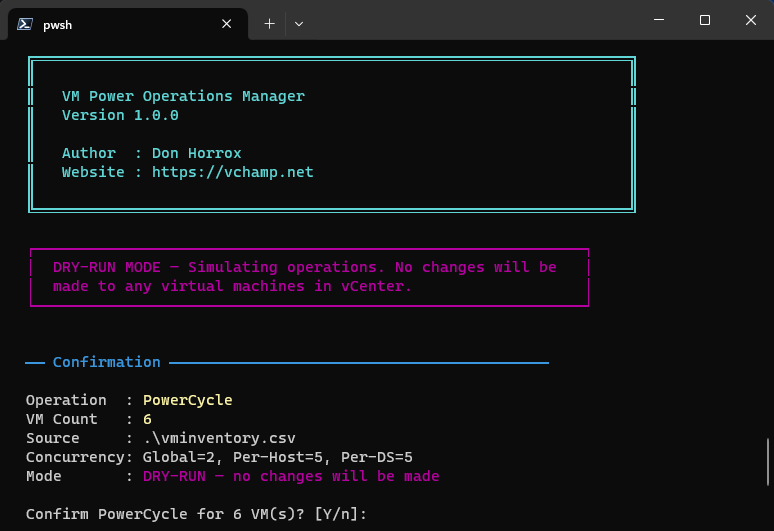
.\Invoke-VMPowerOps.ps1 -vc vcenter.lab.local -s .\vminventory.csv -pc -r Table -cg 3On launch, the script displays a banner with version and author information, followed by a confirmation screen showing the operation, VM count, source file, and any active flags before prompting you to proceed. Credentials are collected securely using Read-Host -AsSecureString and zeroed from memory immediately after the session is established.

Graceful Shutdown Escalation
One of the more important details in any VM shutdown workflow is what happens when a guest doesn’t cooperate. The script handles this with a three-step escalation sequence per VM, run concurrently across the scope:
- Guest OS Shutdown – Issued via VMware Tools for a clean, OS-aware shutdown. This step is skipped automatically if Guest Tools is not running or not installed.
- Power Off – A forced stop via the vSphere API, issued if the guest shutdown times out (default: 300 seconds) or was skipped. This is the equivalent of the “Power Off” button in vCenter.
- Hard Stop – Final Power Off attempt if the “Power Off” command also times out (default: 120 seconds).
If a VM does not respond to any of the three steps, it is marked as failed and flagged for manual review. Each step is logged with timestamps so you have a full audit trail.
I also introduced a feature which may be handy if you are running an emergency shutdown or working with test/temporary VMs which do not require a graceful shutdown: the -ForceOff flag (-f) bypasses the graceful step entirely and starts at Power Off for every VM in scope.
Concurrent Execution with Throttling
Running power operations one at a time against a large VM list is slow. Conversely, running too many simultaneously can overwhelm storage arrays or Hosts. The script attempts to mitigate this concern by balancing three independent concurrency gates, all enforced simultaneously:
-ConcurrentGlobal(-cg) – Caps the total number of simultaneous operations across the entire run. The default value is unlimited.-ConcurrentHost(-ch) – Caps operations per ESX Host. The default value is 5.-ConcurrentDatastore(-cd) – Caps operations per parent datastore. The default value is 5.
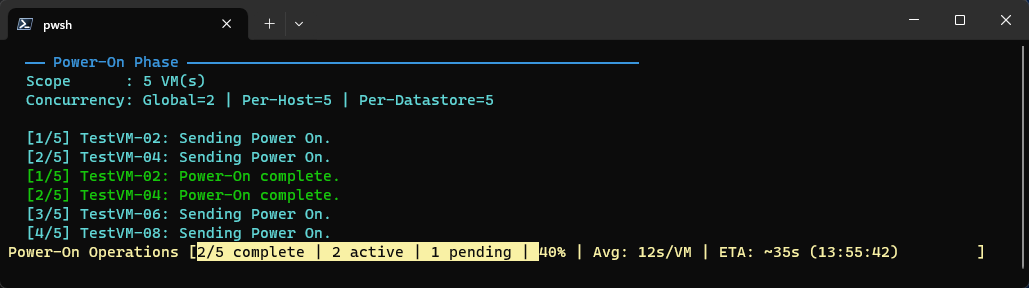
Power operations will not execute on a given VM won’t start until all three gates pass. As each VM completes, its slot opens immediately for the next pending VM rather than waiting for an entire batch to finish. The engine runs in a single polling loop, meaning there are no background jobs.
The progress bar updates every poll cycle (default: 10 seconds) and includes a rolling ETA based on the average time each VM has taken to complete the current operation. The average resets between power-down and power-on phases since the two operations typically have different timing profiles.
When to Use Each Concurrency Gate
The three gates address different bottlenecks in your infrastructure. Understanding which one applies to your situation lets you push operations as fast as your environment can safely absorb them – without finding out the hard way where the ceiling is.
Per-Host Concurrency (-ch)
This is the gate I expect you will reference most often. Each ESX Host has a finite amount of CPU, memory bandwidth, and network I/O available to service power state transitions. A Guest OS Shutdown involves the guest kernel performing a clean unmount of filesystems, flushing buffers, and stopping services – all of which consume CPU on the Host. A power-on involves the host loading BIOS/EFI firmware, initializing virtual hardware, and beginning guest boot – again, CPU and memory bound.
In a typical cluster with heterogeneous VM sizes, running five simultaneous operations per host is a reasonable starting point. You might increase it to 8-10 if you’re working with small, lightly loaded VMs on a host with significant headroom, or decrease it to 2-3 if your hosts are running near capacity or the VMs are large and CPU-intensive during boot.
The per-host gate matters most when your VM list spans many Hosts and you have a balanced cluster. If all 50 VMs in your list happen to be served by the same two hosts, the per-host limit is the only thing standing between an orderly operation and a host that suddenly has 50 concurrent shutdown requests in-flight.
Consider the scenario where a cluster of 6 Hosts, each running 40 VMs, are all scheduled for a maintenance shutdown. With -ch 4, you will have up to 24 operations in flight at once (4 per host x 6 hosts), progressing at a pace each host can comfortably sustain.
.\Invoke-VMPowerOps.ps1 -vc vcenter.lab.local -s .\vminventory.csv -pd -ch 4Per-Datastore Concurrency (-cd)
Power operations are more I/O-intensive than some may believe. A clean Guest OS Shutdown flushes dirty pages to disk before the guest halts. A power-on reads the VM’s memory swap file, loads the guest kernel and drivers, and begins writing memory pages – all of which generate bursts of storage I/O. When several VMs share the same datastore and all begin these sequences simultaneously, the datastore can become the bottleneck, even if the Hosts have plenty of headroom.
This gate is particularly relevant in environments with traditional spinning-disk NFS or iSCSI datastores, or any environment where datastores are heavily consolidated. vSAN and NVMe-backed datastores have significantly higher I/O headroom, so you can often run the default (5) or higher without seeing contention.
Conversely, if you are working with a legacy SAN LUN shared by a large number of VMs, reducing -cd to 2 or 3 can be the difference between a clean operation and one that generates storage latency alerts across the environment.
Consider the scenario where a shared NFS datastore is backing 30 VMs on a legacy (okay, very legacy) NAS array. The array struggles with more than 3 simultaneous random write workloads. Setting -cd 3 ensures the datastore never sees more than 3 concurrent shutdown I/O operations, regardless of how many Hosts the VMs are spread across.
.\Invoke-VMPowerOps.ps1 -vc vcenter.lab.local -s .\vminventory.csv -pd -cd 3Global Concurrency (-cg)
The global gate is for situations where your bottleneck is not a specific host or datastore, but a shared resource that spans the entire operation. The most common examples are vCenter API rate limits, network bandwidth on a management segment, or a storage fabric that services multiple datastores simultaneously and has a total I/O budget that is lower than the sum of individual datastore limits would suggest.
By default, the global gate is unlimited and defers to the per-Host and per-datastore gates, which is sufficient for most environments. However, if you are running a large operation against a vCenter that serves hundreds of VMs and you want to be conservative about API load, or you’re on a shared management network where too many simultaneous SSL handshakes cause timeouts, setting a global cap of 10-20 gives you a predictable ceiling regardless of how the VMs are distributed.
The global gate is also useful during a proof-of-concept or first run against a new environment where you are not yet sure what the infrastructure can absorb. Setting -cg 5 effectively serializes the operation into small groups, giving you time to observe performance metrics before increasing the limit.
Consider the scenario where a vCenter is managing 200 VMs across 8 Hosts and 12 datastores. You want to power-cycle all 200 but you’re concerned about vCenter API throughput during business hours. Setting a global cap keeps the operation from flooding vCenter with requests, while the per-Host and per-datastore gates continue to distribute the load reasonably.
.\Invoke-VMPowerOps.ps1 -vc vcenter.lab.local -s .\vminventory.csv -pc -cg 15 -ch 5 -cd 4Combining All Three
The gates are independent and additive in that a VM must clear all three before the power operation executes. This lets you compose a policy that reflects your actual infrastructure constraints rather than having to choose a single limit that satisfies every bottleneck at once.
A typical production configuration might look like:
.\Invoke-VMPowerOps.ps1 -vc vcenter.lab.local -s .\vminventory.csv -pc -cg 20 -ch 4 -cd 3 -r CSVThis reads as: no more than 20 operations in flight globally, no more than 4 operations per Host (conserving compute resources), and no more than 3 operations per datastore (conserving I/O). The power operations all run concurrently within those bounds, with results exported to CSV upon completion.
If you are uncertain where to start, the defaults (-ch 5, -cd 5, no global limit) are intentionally conservative enough for most environments. Use -DryRun (-d) first to see how your VM list distributes across hosts and datastores, then tune from there. I will discuss Dry Run more below.
Power-Cycle with DRS Awareness
The power-cycle operation (-pc) is where the orchestration gets more interesting. After the power-down phase completes, the script pauses and asks you to confirm before proceeding to the power-on phase. This empowers you to control the timing to allow for validation of shutdown results, checking environment health, or run any inter-step tasks.
When you confirm, the script does something that most ad-hoc shutdown scripts miss: it re-queries the current ESX Host for every scoped VM before executing the power-on operation. This matters in environments where the Distributed Resource Scheduler (DRS) is enabled, because VMs may have migrated to different Hosts between power operations executed by the script. Without this check, the per-Host concurrency gate would be calculated against potentially stale placement data, which may inadvertently execute too many simultaneous power-on operations for a single Host.
Any detected migrations are logged and reported, and the updated placement data is used for the power-on concurrency gates.
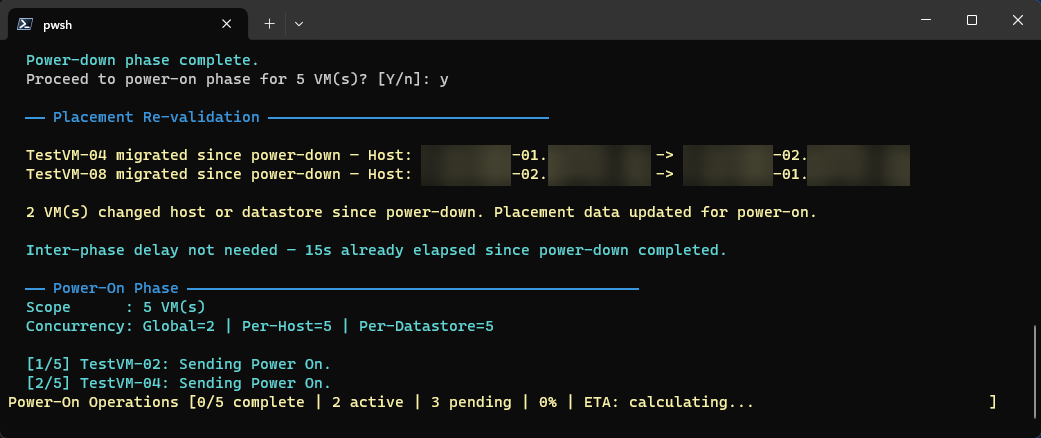
There is also a configurable inter-phase delay (default: 15 seconds) between the two phases to reduce simultaneous power-on load. Note that if you took longer than 15 seconds to respond to the confirmation prompt, the delay is skipped, as the time passed while you were reading the screen. This is a simple safely mechanism to add buffer between power phases.
Dry-Run Mode
Before running any operation against a Production VM list for the first time, it is recommended to use the -DryRun (-d) flag. When invoked, the script authenticates to vCenter, resolves all scoped VMs, checks VMware Tools status, and prints exactly what it would do – including which VMs would receive Guest OS Shutdown vs. Power Off, which would be skipped as VLR placeholders, and which belong to linked vCenters, all without executing a single power command.
.\Invoke-VMPowerOps.ps1 -vc vcenter.lab.local -s .\vminventory.csv -pc -dDry-run output uses vibrant magenta [DRY-RUN] markers to distinguish simulated actions from real ones. Each entry includes the VM name, VM ID, and its position in the queue.
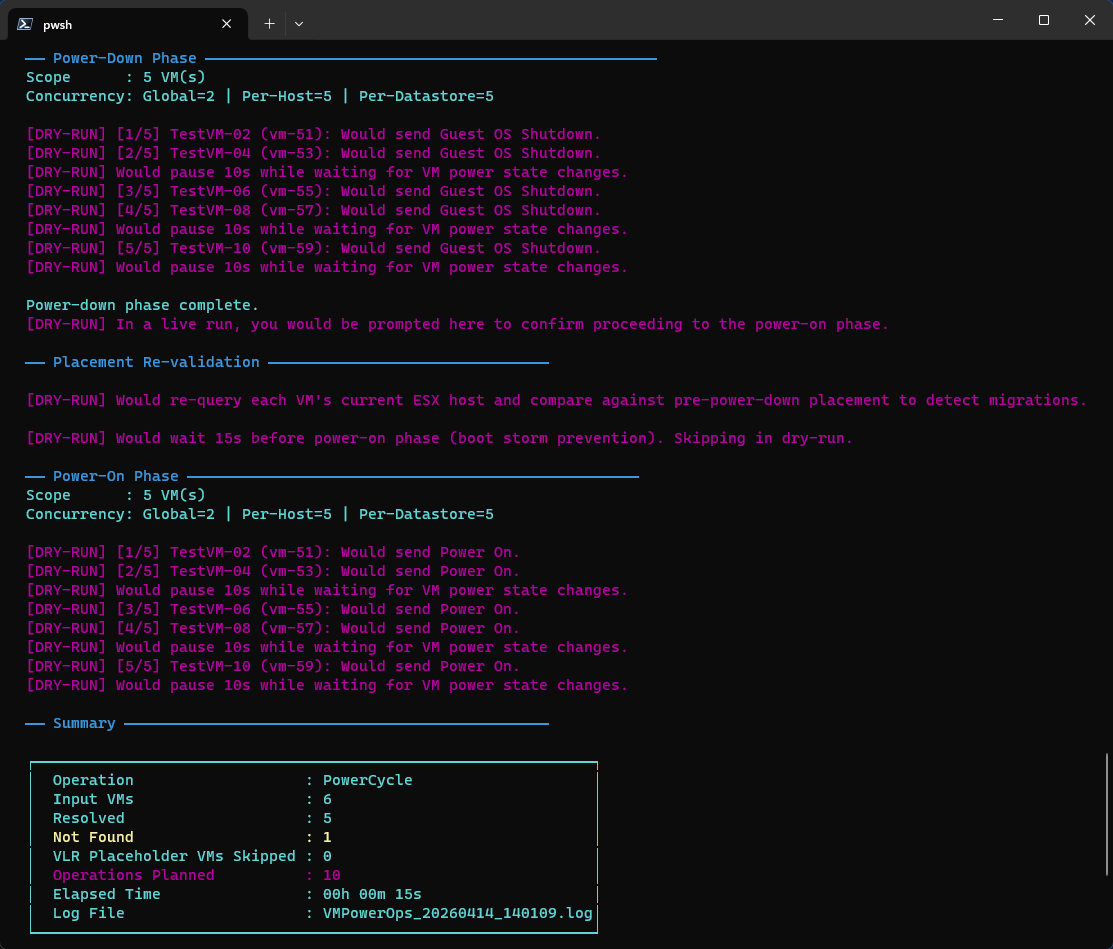
The simulation completes near-instantly since polling sleeps and inter-phase delays are skipped. The summary box at the end shows Operations Planned instead of Operations Run and omits the success/fail breakdown, since nothing actually ran.
Linked Mode Awareness
If your vCenter Server participates in Enhanced Linked Mode (ELM), VM name searches may return results from all linked vCenters. The script handles this by enumerating the ESX Hosts registered to the target vCenter Server at startup and building a VM-to-host map. Any VM whose resolved Host doesn’t belong to the target vCenter is skipped and reported, ensuring operations stay scoped to exactly the vCenter you specified.
Result Output
When the run is complete, you can export results in four formats using the -ResultOutput (-r) argument:
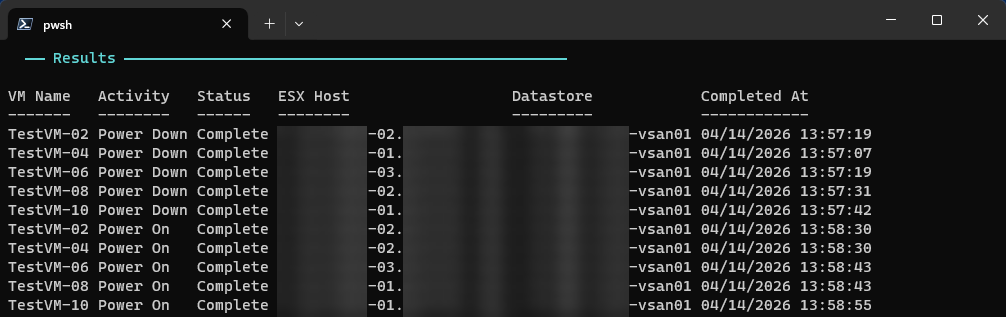
- Table – Results are printed inline in the terminal immediately after the operation.
- CSV – Results are written to the script directory (“working directory”) with a timestamped filename.
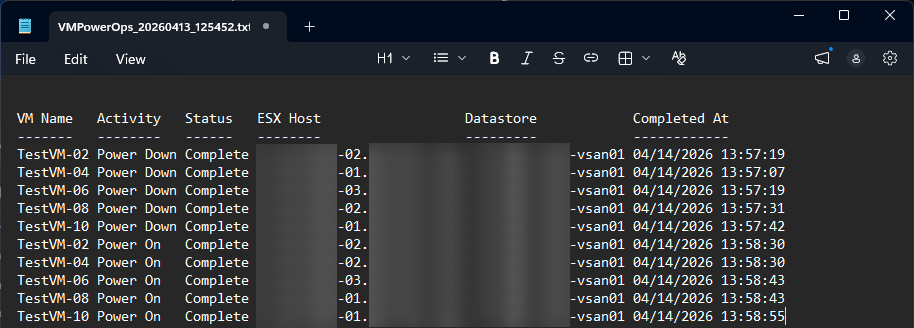
- Text – Results are written as a plain-text formatted table to the script directory (“working directory”) with a timestamped filename.
- GridView – Results are displayed in an interactive, sortable, filterable grid in a separate PowerShell window (Windows only).
The result table includes VM name, activity (Power Down or Power On), status (Complete / Skipped / Error), parent ESX host, parent datastore, and completion timestamp. All timestamps use MM/dd/yyyy HH:mm:ss format regardless of system locale, which keeps CSV output consistent when opened in Excel.


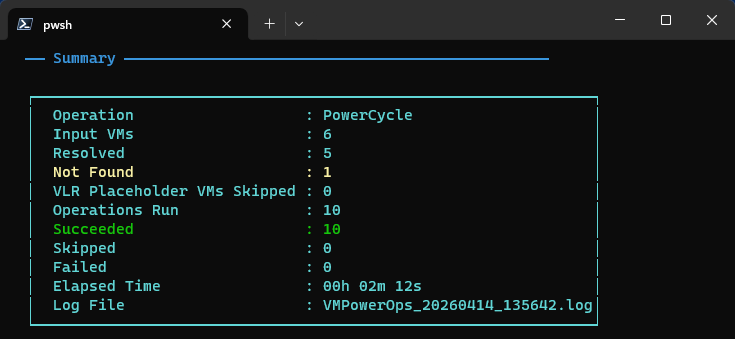
Final Summary Content
Every run closes with a summary box showing counts for each category: resolved VMs, not found, VLR placeholders skipped, operations run, succeeded, skipped (already in desired state), failed, elapsed time, and the log file name.
Logging
A timestamped log file is written to the script directory (“working directory”) for every execution (i.e., VMPowerOps_20260412_130547.log).
All entries use a consistent [timestamp] [LEVEL] message format. By default, only INFO, OK, WARN, and ERROR entries are written. Enabling -VerboseLogging (-v) adds DEBUG-level entries covering API calls, VM resolution detail, per-VM Host and datastore assignments, and poll cycle internals. This information is useful for troubleshooting or auditing.
Where to Get It
The script is available on GitHub, along with full documentation covering all parameters, the complete permissions setup, tunable constants, and more examples. You can also find this script – in addition to many others from the vCommunity – on the Sample Exchange hosted by Broadcom.
Note that this script is not actively maintained and offers no guarantee or warranty. Run this script at your own risk, as you would for any other obtained online. I highly recommend executing this script in a dedicated test/lab environment first and hope it helps make your life just a little bit easier!