Estimated reading time: 7 minutes

Designing custom forms in Aria Automation Service Broker is fundamentally user centric. Each element – whether it’s a field, image, or button – exists to both enrich the user experience and guarantee a standardized deployment. “Standardize” is the keyword here. The goal of automation in many organizations is to implement consistent standards, ensuring resources are uniformly deployed. While deploying virtual machines using a standard image or template is a good start, we can enhance this process with input validation on custom forms. Specifically, we can leverage Regular Expressions (RegEx) to evaluate complex input criteria – more than simply meeting a minimum or maximum numeric value.
Imagine scenarios where users need to enter a password, request number, or any other information that must meet certain criteria to be valid. Without input validation, there’s a risk of accepting insecure or incorrect inputs, defeating the purpose of automation. Let’s investigate a few examples below:
Getting Started
First, we need to launch Service Broker and select a Custom Form.
- Using a web browser of choice, launch Aria Automation and navigate to Service Broker as needed.
- Click on the “Content & Policies” tab, located along the top ribbon.

- Click on the “Content” menu item, located within the left-side navigation pane.

- Locate the Cloud Template or Automation Orchestrator Workflow you wish to modify. Keep in mind, you are simply modifying the Custom Request Form – not the Cloud Template or Orchestrator Workflow itself.
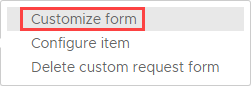
- Once identified, click on the “three vertical dots” icon, to the left of the content name, then click on the “Customize Form” menu item which appears.

In the sections below, we will select an input field and define the RegEx string which Service Broker will reference to evaluate compliance.
Example One – Request Number
In this example, our Service Broker form is designed with an input field for the user to specify an internal request number and is a simple text field. The request number will likely refer to a request/ticket/case in your organization’s IT Service Management (ITSM) platform, such as ServiceNow. The field value will be stored as a Custom Property of the deployment, which can save Administrators time in the future if they need to research key deployment details: who/what/when/where/why. To that end, it’s important that valid request numbers be supplied in this field, otherwise it leads to a dead end.
Criteria
- Value must begin with the letters “REQ“.
- All letters must be capitalized (for standardization).
- Exactly seven (7) numbers/digits must be appended after the letters.
RegEx String
^(REQ)[0-9]{7}$This RegEx string meets the criteria by ensuring that the input value must begin with “REQ“, followed by exactly seven (7) digits, with each digit between 0-9.
Focusing on ServiceNow as the ITSM platform of choice, we know that it is conceivable that multiple deployment requests can be filed under the same Request (“REQ”) number. This presents a challenge, as we do not necessarily want to re-use the same value multiple times. ServiceNow structures requests in such a way that the Request Number (“REQ”) is the parent record, with a Request Item (“RITM”) child record beneath it, and Service Catalog Task “SCTASK” record as a child record of the RITM. Although each unique deployment request likely has its own Request Item record, you may wish to allow Administrators to provide either of these three record types in the Service Broker form, at their discretion.
Modified Criteria
- Value must begin with the letters “REQ“, “RITM“, or “SCTASK“.
- All letters must be capitalized (for standardization).
- Exactly seven (7) numbers/digits must be appended after the letters.
RegEx String
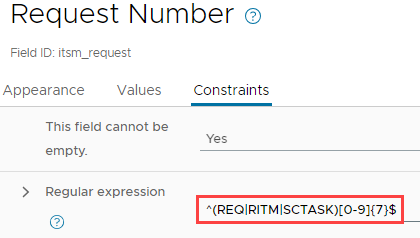
^(REQ|RITM|SCTASK)[0-9]{7}$This RegEx string meets the criteria by ensuring that the input value must begin with “REQ“, “RITM“, or “SCTASK“, followed by exactly seven (7) digits, with each digit between 0-9.
Example Two – IP Address
In this example, our Service Broker form is designed with an input field for the user to specify an IP Address inside a simple text field. Assuming the IP Address has been manually assigned and does not relate to an IP Address Management (IPAM) integration, this concept is fairly straightforward. Like the last example, the field value will be stored as a Custom Property of the deployment, which can be referenced by Cloud-Init or Cloudbase-Init if desired. To that end, it’s important that a valid IP Address value be supplied in this field, otherwise the deployed resource may not behave as expected or fail altogether.
Criteria
- Value must contain four octets, separated by dots.
- Each octet is between 0-255.
RegEx String
^(([0-9]|[1-9][0-9]|1[0-9]{2}|2[0-4][0-9]|25[0-5])\.){3}([0-9]|[1-9][0-9]|1[0-9]{2}|2[0-4][0-9]|25[0-5])$This RegEx string meets the criteria by ensuring that the input value contains four octets (i.e., 0.0.0.0) and each octet is between 0 and 255 (i.e., 0.0.0.0 – 255.255.255.255). Obviously, some of these values are invalid for most virtual machine deployments but may apply to other deployed resources such as routers or load balancers. This is just a starting point and can certainly be tweaked to meet specific needs per form/deployment.
Configure Input Validation
Once you have determined the input field, validation criteria, and RegEx code, you may configure the field to begin validating with this logic. Picking-up from the “Getting Started” section above, let us assume you have selected the desired input field already.
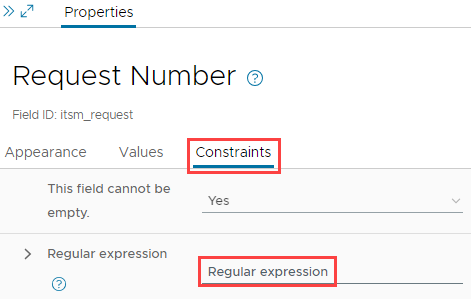
- With the desired input field already selected, click on the “Constraints” tab, located inside the “Properties” pane to the right-side of the page.
- Locate the “Regular Expression” field and notice that it is blank/undefined.
- Paste your RegEx string into the “Regular Expression” field.
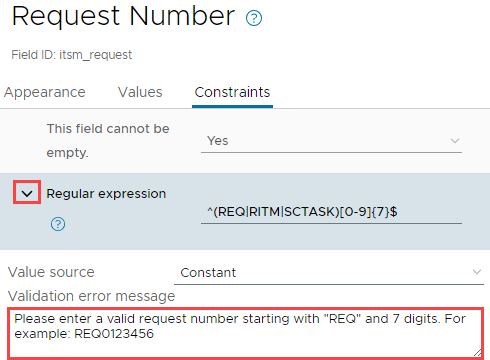
- (Optional) If you would like to provide users with a message to clarify the input criteria, click on the “chevron” button, located to the left of the “Regular Expression” field. You may type a message of choice inside the “Validation Error Message” field, which only displays if the user specifies an invalid value inside the field.
- Click on the “Save” button, located at the bottom-left corner of the page.
Learn More about RegEx
Regular Expressions (RegEx) are common and can be complex to understand with the naked eye. Those responsible for designing custom forms should also perform thorough validation of the RegEx code before implementing in Production, which can require “trial and error” in the absence of a validation utility. Below are a couple of helpful resources I have used in the past to learn about RegEx and test my patterns prior to implementation:
RegExr – https://regexr.com
Open source HTML/JS based tool for creating, testing, and learning about Regular Expressions. Provides a validation engine (“Tests”) which allows the user to provide their own custom RegEx string in addition to one or more values to validate against. RegExr will report a Pass/Fail result based on evaluation in real-time. RegExr also provides a RegEx Cheatsheet and Reference Guide to help users learn more about Regular Expressions. There is even a “Community Patterns” section where registered users have contributed their own patterns for you to reference!
regex101 – https://regex101.com
Comparable to RegExr, regex101 provides a validation engine for Regular Expression patterns and breaks-down each validation step. This is a highly customizable web-based utility which also provides a library of Regular Expressions curated by their online community.