Estimated reading time: 7 minutes

Service Broker simplifies the process of crafting custom forms within Aria Automation, streamlining the inclusion of text fields, radio buttons, and drop-down menus. However, Administrators often encounter a roadblock with what appears to be a straightforward task: embedding images into a custom form. While incorporating other form elements is as simple as dragging and dropping the respective element from the Inputs Pane onto the Canvas, the process of providing the image file itself introduces a challenge. This brief post will explain the necessary steps to successfully place an image on your custom form.
Getting Started
- Using a web browser of choice, launch Aria Automation and navigate to Service Broker as needed.
- Click on the “Content & Policies” tab, located along the top ribbon.

- Click on the “Content” menu item, located within the left-side navigation pane.

- Locate the Cloud Template or Automation Orchestrator Workflow you wish to modify. Keep in mind, you are simply modifying the Custom Request Form – not the Cloud Template or Orchestrator Workflow itself.
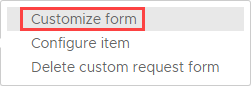
- Once identified, click on the “three vertical dots” icon, to the left of the content name, then click on the “Customize Form” menu item which appears.

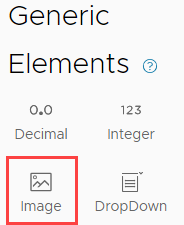
- Locate the “Image” tile, located within the left-side navigation pane and beneath the “Generic Elements” heading.
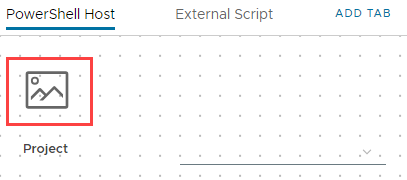
- Click and drag the “Image” tile onto the Canvas. Ideally, place the file where you would like the image to appear. Don’t worry if you can’t place it exactly where you would like – it can be easily relocated later.
- Click on the newly placed image tile as needed, and notice the Properties pane to the right of the window indicates that the image tile is selected.
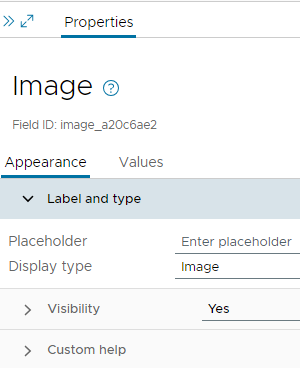
- Click on the “Values” tab. Notice that the “Value” field is empty. This is great, but how do we specify the image file we would like to use?
Images are not simply uploaded to the Aria Automation appliances. While researching this question, I located a relatively new and little-known VMware KB article, which provides some clarity: see KB 94982.
Depending on the configuration of your environment, you may or may not allow the Aria Automation appliances to access the Internet. If this is permitted, you can simply paste the web address to an image file of your choosing inside the “Value” field. The same applies to internal web servers or company Intranet pages, generally speaking. Just like that – your image is now visible on the canvas! - Click on the “Save” button located at the bottom-left corner of the window to save changes to your custom form.
Wait, there’s more!
Unfortunately – and for good reason – this configuration is not always possible nor desired. Consider the following scenarios which may complicate things:
- Aria Automation appliances are prohibited from accessing the Internet for security reasons.
- The image is accessible but requires authentication for the user to actually view it.
- The image is not suitable for public release and should be kept internal.
Luckily, you have another option by deriving the base64 encoded string of your image!
If you are not opposed to uploading the image to an online service to generate the base64 string, you can try one of these services below, as recommended by the VMware KB:
- Base64 Image Converter by Awesome Bonn UG – https://www.base64-image.de/
- Base64 Guru – https://base64.guru/converter/encode/image
That said, not all images are suitable for upload to the public Internet, such as screenshots which may contain proprietary data. In this case, it may be best to generate the Base64 string locally – omitting the Internet altogether. We can achieve this task with PowerShell:
# Prompt the user to type or paste the full path to the image file (i.e., C:\Users\MyUser\Desktop\MyImage.png)
$path = Read-Host "Please enter the path to the image file, then press Enter."
# Check if the file location is valid.
if (Test-Path $path) {
    # Generate the Base64 encoded string for the provided image.
    $imageBytes = [System.IO.File]::ReadAllBytes($path)
    $base64 = [Convert]::ToBase64String($imageBytes)
    # Output the Base64 encoded string to the user within the PowerShell window.
    Write-Output "Base64 Encoded String:"
    Write-Output $base64
} else {
    # If the file path is invalid, inform the user. Note that if the file path contains spaces, you must wrap the entire path with double quotes.
    Write-Output "File not found."
}The PowerShell script returns the Base64 encoded string, which is quite long. The screenshot below has been trimmed to conserve space in this post.

While you could simply copy and paste the output into a text editor, we can modify the PowerShell code to create a text file with the output automatically. In addition, when supplying a Base64 encoded string into a Service Broker image element, you must provide a prefix so that Service Broker knows how to interpret the string (data:image/png;base64,). We can include that inside our script as well!
# Prompt the user to type or paste the full path to the image file (i.e., C:\Users\MyUser\Desktop\MyImage.png)
$path = Read-Host "Please enter the path to the image file, then press Enter."
# Check if the file location is valid.
if (Test-Path $path) {
    # Generate the Base64 encoded string for the provided image.
    $imageBytes = [System.IO.File]::ReadAllBytes($path)
    $base64 = [Convert]::ToBase64String($imageBytes)
    $base64WithPrefix = "data:image/png;base64," + $base64
    # Output the Base64 encoded string to a text file stored in the working directory.
    $outputPath = ".\imageBase64.txt"
    $base64WithPrefix | Out-File -FilePath $outputPath
    Write-Output "Base64 string has been saved to $outputPath"
} else {
    # If the file path is invalid, inform the user. Note that if the file path contains spaces, you must wrap the entire path with double quotes.
    Write-Output "File not found."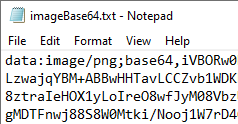
}This time, the script prompted the user to input the path of the image file, generated the Base64 encoded string, and saved it to the working directory where PowerShell was executed!

After opening the output text file in a text editor of choice, we can see that the Base64 encoded string was indeed generated and matches the output from our first attempt, when the string was output to the PowerShell window. Notice the required prefix is also included in the text! Once again, the screenshot has been trimmed to reduce space in this post.
Now that our Base64 encoded string has been generated, we can include it within our custom form.
- Open the output file generated by our script in a text editor if your choice.
- Select the file contents contents in its entirety (Edit > Select All – for most Windows applications).
- Copy the file contents (Edit > Copy – for most Windows applications).
- Return to the custom form in Service Broker and click on the image tile you dropped on the Canvas previously. Click on the “Values” tab from the Properties pane, if needed.
- Right-click inside the “Value” field, located within the “Values” tab, then click on the “Paste” menu item. Notice that the content from our output file is now stored inside a long single string of text.
- Notice that the image now appears on the canvas!
- Click on the “Save” button located at the bottom-left corner of the page to save changes to your custom form.
Although not overly complex, this method of injecting an image inside of a custom form is uncharted territory for most of us. Inclusion of images on custom forms is just the beginning to enriching the user experience and furthering your Automation journey!