Estimated reading time: 8 minutes

Prerequisites and Assumptions
- You must have appropriate rights/privileges to manage Aria Suite Lifecycle and Aria Automation.
- You must have appropriate rights/privileges to sign internal SSL certificates.
- This article reflects the procedure relevant to Aria Automation and Aria Suite Lifecycle 8.18.
- This article assumes that Microsoft Active Directory Certificate Services is the acting Certificate Authority in your environment.
- This article assumes that your Automation environment is load-balanced with certificate passthrough (where the load balancer does not provide the certificate) and there are multiple Automation nodes in your cluster.
- Ensure you have arranged the necessary communications and understood risks associated with replacing certificates, as mistakes and unforeseen circumstances may result in downtime.
- Ensure you have captured snapshots (preferably “offline”/powered-off) of the Automation nodes.
Generate a Certificate Signing Request (CSR)
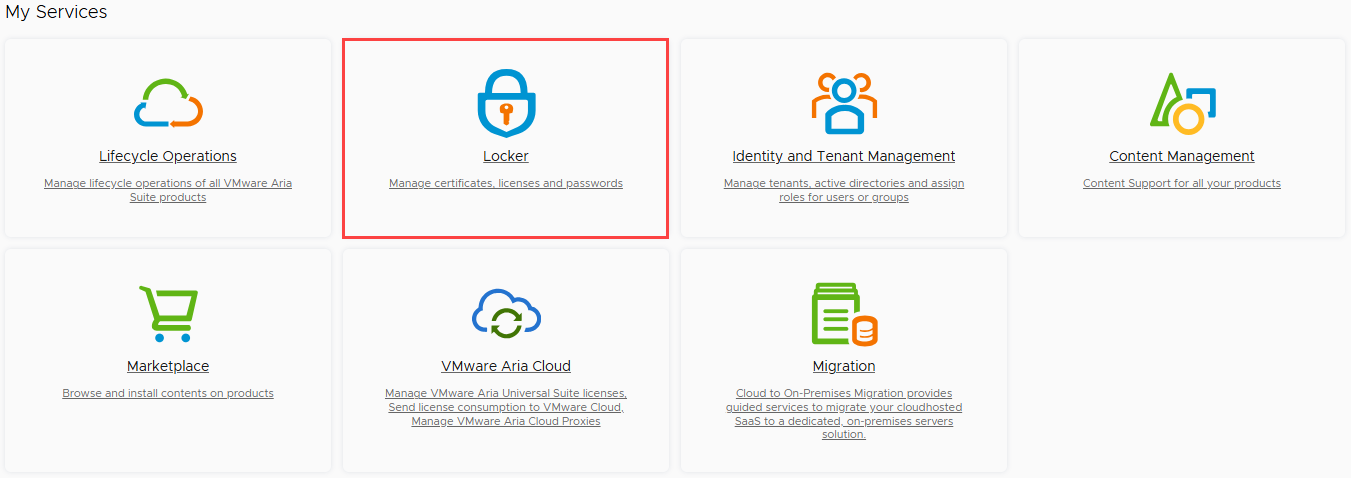
Using a web browser of choice, navigate to Aria Suite Lifecycle and authenticate as required.
The service catalog is displayed. Click on the “Locker” tile.
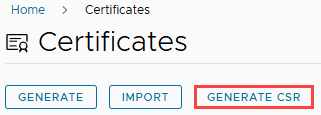
Click on the “Generate CSR” button, located beneath the “Certificates” heading.
Populate each of the fields, beginning with the CSR name. The CSR name is trivial and will not be stored in Aria Suite Lifecycle, although it is recommended to follow a standard naming convention to avoid confusion. In this example, I am using “vRA-Cert-YYYYMMDD”.
The “Common Name (CN)” field should reflect the load balanced Fully Qualified Domain Name (FQDN) of your Automation instance.
The “Organization (O)” field should reflect your company name, in alignment with organizational policies and standards.
The “Organizational Unit (OU)” field should reflect your team/division name, in alignment with organizational policies and standards.
The “Country Code (C)” field should reflect the country where your organization is based, in alignment with organizational policies and standards. This is expected to be a two-character code, such as “US”.
The “Locality (L)” and “State (ST)” fields are optional but should be populated if relevant to your region, in alignment with organizational policies and standards.
The default “Key Length” selection is 2,048 bits. You may keep this selection, although it is recommended to select 4,096 bits if supported by your Certificate Authority.
The “Server Domain/ Hostname” field should be populated with the following values, separated by commas:
- Load Balanced FQDN (i.e., automation.lab.local)
- Automation Node #1 FQDN (i.e., automation-01.lab.local)
- Automation Node #2 FQDN (i.e., automation-02.lab.local)
- Automation Node #3 FQDN (i.e., automation-03.lab.local)
Example: automation.lab.local,automation-01.lab.local,automation-02.lab.local,automation-03.lab.local
The “IP Address” field should be populated with the following values, separated by commas:
- Load Balanced IP Address (i.e., 192.168.20.10)
- Automation Node #1 IP Address (i.e., 192.168.20.11)
- Automation Node #2 IP Address (i.e., 192.168.20.12)
- Automation Node #3 IP Address (i.e., 192.168.20.13)
Example: 192.168.20.10,192.168.20.11,192.168.20.12,192.168.20.13
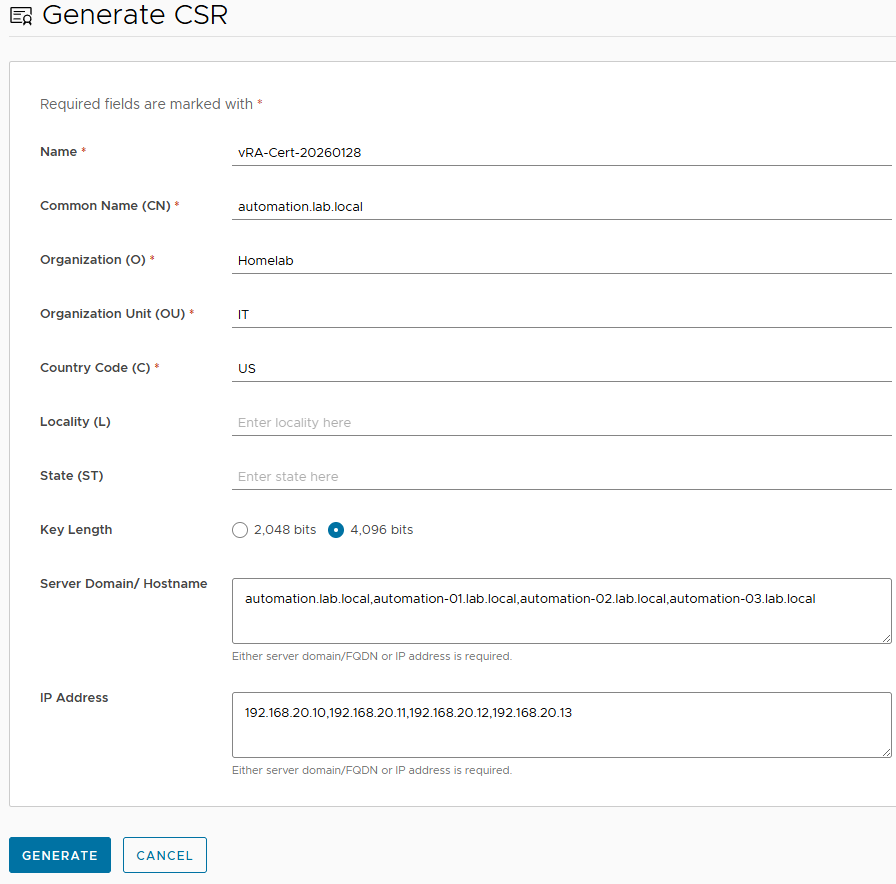
Click on the “Generate” button.
The CSR file (.pem) download will begin. If prompted, save the file to a memorable directory on your local workstation.
Sign the Certificate
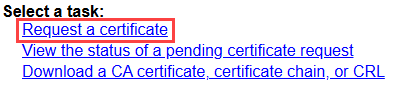
In a new browser window or tab, navigate to the Certificate Services Portal.
Click on the “Request a Certificate” link.
Click on the “Submit a certificate request by using a base-64-encoded CMC or PKCS #10 file, or submit a renewal request by using a base-64-encoded PKCS #7 file.” link.

Using a text editor of choice, open the CSR (.pem) file downloaded in previous steps.
Select all text inside the file, then copy and paste the contents into the “Base-64-encoded certificate request (CMC or PKCS #10 or PKCS #7)” text field. This data includes the certificate request and private key generated by Aria Suite Lifecycle.
Select the appropriate “Certificate Template” from the drop-down list. Note that the Administrators of your Certificate Authority may have defined the list of options with different names, durations, etc.
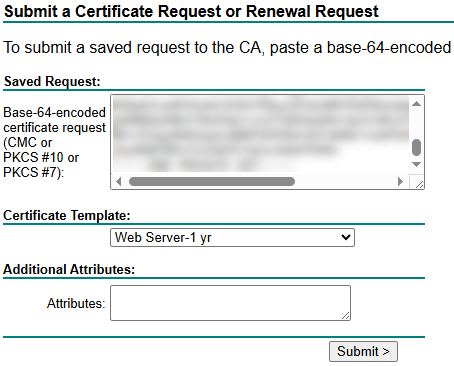
Click on the “Submit” button.
The certificate file (.cer) download will begin. If prompted, save the file to a memorable directory on your local workstation.
Using a text editor of choice, open the certificate (.cer) file.
Open your organization’s intermediate (if applicable) and root certificates in a text editor of choice.
In order to form a “Certificate Chain“, copy the entire file contents of the Intermediate CA certificate, then paste at the bottom of the certificate file you just generated in the steps above. Perform the same step for the Root CA certificate.
The certificate file should now appear similar to the below:
-----BEGIN CERTIFICATE REQUEST-----
Generated certificate content goes here.
-----END CERTIFICATE REQUEST-----
-----BEGIN CERTIFICATE REQUEST-----
Intermediate CA certificate content goes here.
-----END CERTIFICATE REQUEST-----
-----BEGIN CERTIFICATE REQUEST-----
Root CA certificate content goes here.
-----END CERTIFICATE REQUEST-----
Save the file.
Stage the Certificate
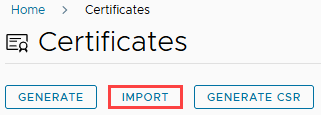
Return to the browser tab/window with Aria Suite Lifecycle open. On the Certificates page, click on the “Import” button.
Type a unique name for the certificate inside the “Name” field. This label will be reflected in the future when you choose to assign this certificate from the Locker. It is recommended to follow a standard naming convention to avoid confusion. In this example, I am using “vRA-Cert-YYYYMMDD”
Copy and paste the Private Key from the CSR into the “Private Key” text box. The content should appear similar to the below:
-----BEGIN PRIVATE KEY-----
Private key content goes here.
-----END PRIVATE KEY-----
Copy and paste the entire file contents of the Certificate Chain, created in pervious steps, into the “Certificate Chain” text area.
The content should appear similar to the below:
-----BEGIN CERTIFICATE REQUEST-----
Generated certificate content goes here.
-----END CERTIFICATE REQUEST-----
-----BEGIN CERTIFICATE REQUEST-----
Intermediate CA certificate content goes here.
-----END CERTIFICATE REQUEST-----
-----BEGIN CERTIFICATE REQUEST-----
Root CA certificate content goes here.
-----END CERTIFICATE REQUEST-----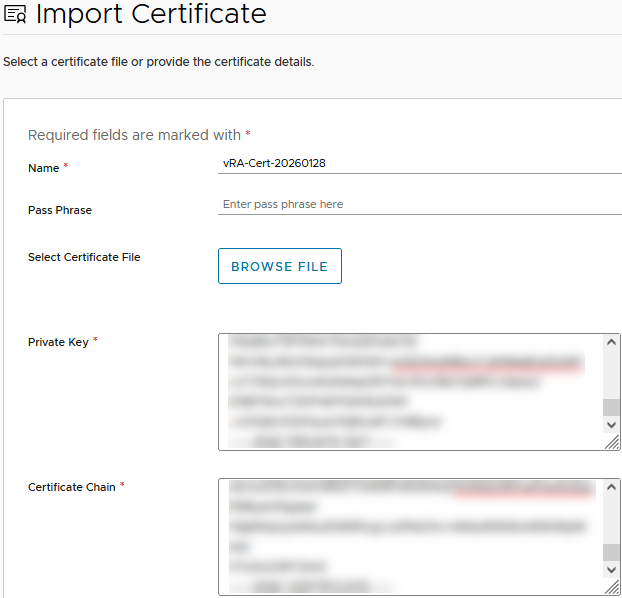
Click on the “Import” button.
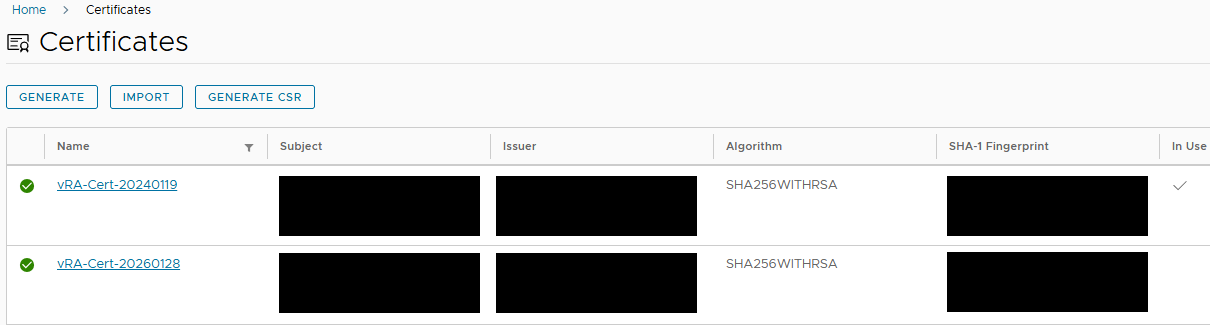
The certificate will now appear on the “Certificates” page. Notice the “In Use” column indicates which certificate is bound to one or more applications managed by Aria Suite Lifecycle.
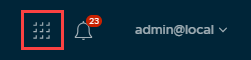
Click on the services icon (3×3 squares) located at the top-right corner of the window.
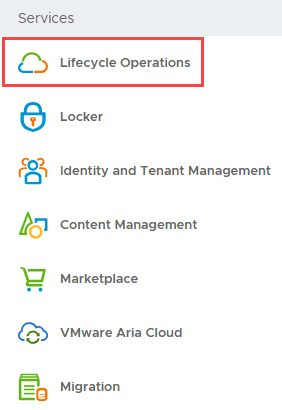
Click on the “Lifecycle Operations” menu item.
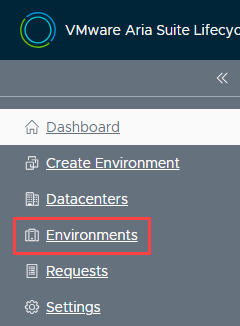
Click on the “Environments” menu item, located within the left-side navigation.
Click on the “View Details” label, located beneath the environment you have in-scope.

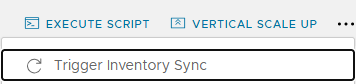
It is recommended to “Trigger an Inventory Sync” prior to making any changes to ensure Aria Suite Lifecycle has synchronized the most current information for the product. Click on the ellipsis (“…“) button, located along the ribbon, then click on the “Trigger Inventory Sync” menu item.
The “Trigger Inventory Sync” dialog box appears. Click on the “Submit” button and wait for the process to complete, then return to this page.
Replace the Certificate
Click on the ellipsis (“…“) button, located along the ribbon, then click on the “Replace Certificate” menu item.

The Current Certificate is displayed, including the expiration date, and other pertinent information. Click on the “Next” button.
The “Select Certificate” page appears. Click on the dropdown menu and select the certificate imported in previous steps. Once selected, pertinent information about the certificate is displayed. Review for accuracy, then click on the “Next” button.
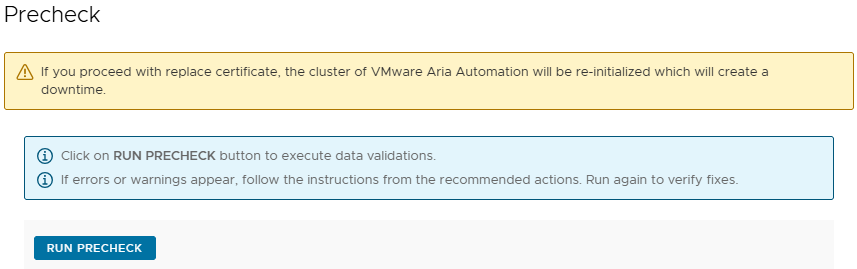
The “Precheck” window appears. Click on the “Run Precheck” button to perform checks and wait for the process to complete.
Precheck results appear. Assuming all checks pass, the “Finish” button will illuminate at the bottom-right of the window. Note that a “Warning” message may appear indicating that you may need to re-trust relationships between Automation and other products, such as Operations, if configured. In addition, if Automation is served behind a load balancer which presents the SSL certificate to users (passthrough not enabled), then the certificate must be updated on the load balancer as well.
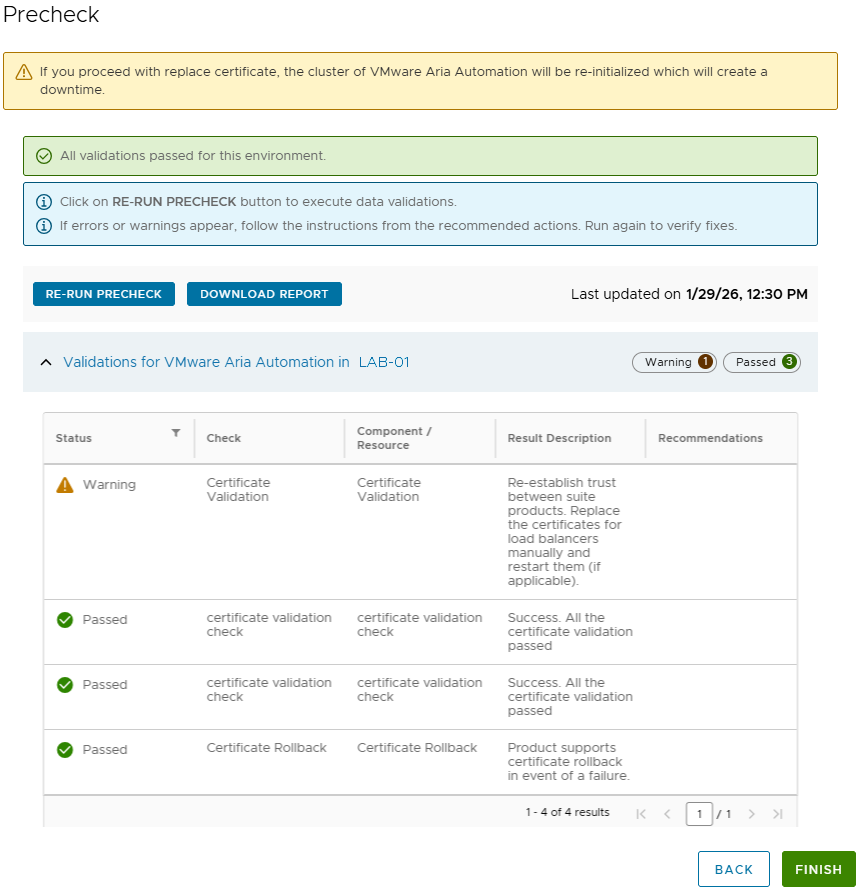
In this example, a load balancer is configured but in passthrough mode. Therefore, the certificate is provided by Automation and it is not necessary to reconfigure the load balancer.
Warning
Clicking on the “Finish” button will begin the certificate rotation process, which will result in a brief downtime while Automation containers are reset. In this environment, the operation completed in about 25 minutes.
Click on the “Finish” button to begin the certificate rotation process.
The “Request Details” chart dynamically indicates the current status of the operation. Although it is not necessary to actively watch the screen, it is recommended to check every couple of minutes to ensure early detection of errors, if any. Although the chart data may not reflect progress at a granular level (which makes some of us anxious), rest assured that the containers are restarting and the process can be time consuming.
Once complete, the “Request Details” chart will appear similar to the below.

Using a web browser of choice, open an InPrivate/Incognito session and browse to your Automation FQDN. Avoid use of a standard browser window for the moment to prevent browser cache from interfering with validation.
Click on the “padlock icon” located to the left of the Automation FQDN in the address bar. This may appear differently depending on browser selection and version. This article assumes use of Firefox.

Click on the “Connection Secure” menu item, then click on the “More Information” menu item.
The “Page Info” window appears, with the “Security” tab selected. Click on the “View Certificate” button.
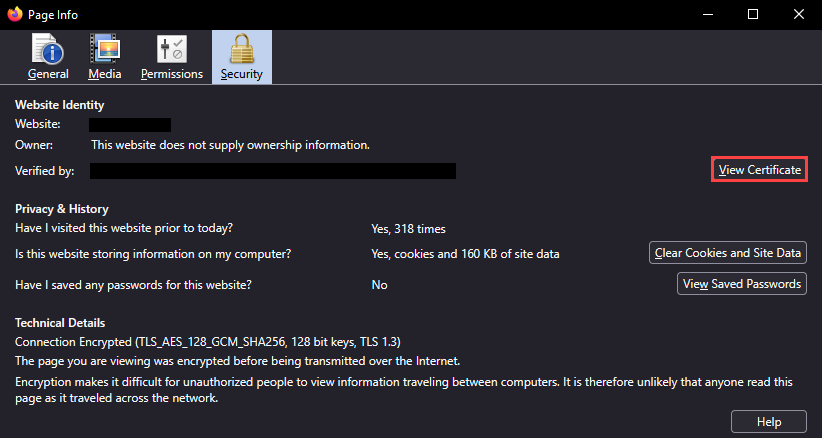
Review the certificate details, such as the Common Name, Subject Alt Names, etc.
The certificate for Automation has been successfully replaced!