Estimated reading time: 13 minutes

Upgrading Virtual Machine Hardware Compatibility versions can be tedious, especially when you have hundreds or even thousands of VMs scoped. The accepted technical guidance from VMware over the years has instructed to only upgrade the Hardware Compatibility version for a given VM if necessary to resolve or mitigate specific technical issues or security vulnerabilities. One classic example is the speculative execution (Spectre/Meltdown) vulnerability, for which a mitigation became available starting with Hardware Version 9. VMware later recommended upgrading to Hardware Version 11 to optimize VM performance with the security mitigation applied. Refer to Broadcom Security Advisory VMSA-2018-0004, if you are interested in further details. Suppose you wanted to upgrade to Hardware Version 11 across hundreds of VMs – that could be a real pain in the neck without PowerCLI at your disposal.
Before you begin
This article assumes you already have PowerCLI installed and the user credentials you intend to supply have adequate permissions to the target vCenter server. Note that this script has been validated on vSphere/ESXi 7.0 U3 and PowerCLI 13.2.0 and compatibility cannot be guaranteed across all versions, hence it is highly recommended to test in a lab/non-production environment first.
Ensure you have snapshot(s), ideally with separate and validated backup(s) captured, in the event that you must revert for any reason. Remember that snapshots are not backups, so plan accordingly.
Review Broadcom KB 315665 (formerly KB 1003746 pre-acquisition) for a matrix of VM Hardware Compatibility Versions and the Hypervisors which support them. Note that you should seek to upgrade VMs to the lowest common denominator across hosts. Although a given host can support a VM operating a Hardware Compatibility Version which is lower than the maximum supported version for the host, it cannot support a VM of a higher version. For example, if you have an environment with mixed hypervisor versions (i.e., vSphere 6.7 U2 and 7.0 managed by a vCenter Server 7.0 instance), it is highly recommended to upgrade no higher than Hardware Compatibility version 15. If you upgrade one or more VMs beyond version 15 in this case, the hosts running vSphere 6.7 U2 will not be able to support them, which may be an issue if you intend to migrate the VMs between the 6.7 and 7.0 hosts.
Review Broadcom KB 315390 (formerly KB 1010675 pre-acquisition) for additional information and context regarding the significance of Hardware Compatibility Versions.
Lastly, this script does not orchestrate the graceful reboot of VMs. This was intentional, as large quantities of VMs tend to serve different purposes and may cross the bounds of Production, Non-Production, QA, and other environments, and should be planned with care.
Prepare the Environment
- Download the
PUT_VM_Properties_Upgrade_Hardware_Compatibility.ps1script and the samplevm_hardware_upgrade.csvCSV file from my GitHub Repository and save to a local directory of your choice. - The script is pre-configured to upgrade VMs to Hardware Version 19. If this is not suitable for your environment, modify the script using a text editor of choice and replace the value on line 35 from “v19” to the version you wish to apply. Note that the “v” prefix must remain, so only modify the numerical value if needed (i.e., “v15” is acceptable, “15” is not).
- Launch a PowerShell session. Depending on user permissions, you may need to launch PowerShell with elevation (as Administrator).
- Open the sample CSV file provided and populate a list of your own virtual machines in Column A, beneath the “Name” heading. Once complete, save and exit the CSV file.
Execute Script
- Change working directories to the directory containing the script (i.e., C:\Scripts)
cd C:\Scripts - Execute the script by typing or pasting the below line within the PowerShell window.
.\PUT_VM_Properties_Upgrade_Hardware_Compatibility.ps1
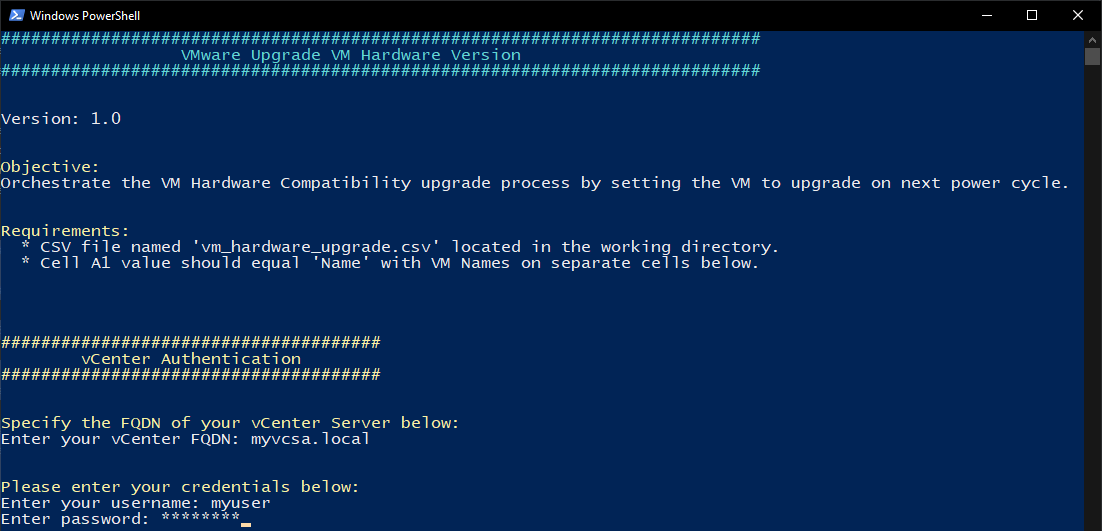
Note: You can use autocomplete to populate the name of the file if you type the first few letters. Try typing “.\PUT” without quotes and press the Tab key to give it a try! - The “Main Menu” is presented, which prompts the user to specify the Fully Qualified Domain Name (FQDN) of the vCenter server. Type the vCenter FQDN, then press the Enter key.
- The next prompt asks for the user’s credentials for authentication to the vCenter server. Type your credentials, then press the Enter key.
Note: User accounts which are child objects of the same SSO Domain as the vCenter server are not required to specify a prefix or suffix to the User ID. However, accounts which are child objects of other SSO domains will be required to specify one or the other, depending on the LDAP configuration. For example, let us assume that the vCenter server’s default SSO Domain is vcenter.local. If the user account is a child object of the vcenter.local SSO Domain, then you would simply enter the user ID (“jdoe” for example) rather than the user ID and suffix (“[email protected]” for example). In similar fashion, if the vCenter server’s default SSO domain is vcenter.local but also has LDAP configured for XYZ Corp’s SSO Domain (i.e., “xyzcorp.com”), a user account which is a child object of the XYZ Corp domain would either specify a NETBIOS domain prefix (i.e., “xyz”) before the user ID, or the domain suffix (i.e., “@xyzcorp.com”) after the user ID. The prefix/suffix may vary based on the LDAP and NETBIOS configuration in your environment. The point being, you would only specify the SSO Domain prefix or suffix if the user account belongs to a SSO Domain other than what is selected as the default for the vCenter server. - The script will now loop through the list of provided VMs. If the scoped VMs are located on the target vCenter Server and are configured with a virtual hardware version less than the version we specified, an attribute will be set to upgrade the hardware compatibility version on the VM’s next power cycle, which can be gracefully executed from the Guest OS – it does not need to be a full power cycle where the VM is properly reset and powered off/on by the hypervisor.
- Upon completion, the user session between PowerShell/PowerCLI and the target vCenter server will be automatically disconnected at the end of the script.
Behind the Scenes
Now that we understand how to interact with the script from a user’s perspective, we can better understand the underlying code:
Lines 1-23
This is your average introductory comment block. Although useful when referencing the code directly, there is no functional value to this block.
<#
.SYNOPSIS
Upgrade VM Hardware Compatibility Version:
Intended to orchestrate the VM Hardware Compatibility upgrade process by setting the VM to upgrade on next power cycle.

Author: Don Horrox (vChamp - https://www.vchamp.net)
Version: 1.0

.DESCRIPTION
 This script must be run on a system with the VMware PowerCli snap-in/module installed and
 authenticated with an account that has appropriate rights to connect to vCenter using PowerCLI.
 To install the PowerCLI module run
 Install-Module -Name VMware.PowerCLI

 Prerequisites:
 1) User must have adequate rights in vCenter retrieve and update the VM configuration.
 2) User must have adequate rights to save log output file to the working directory on the local system running the script. Run PowerShell with elevation (as Administrator) as needed.
 3) User must provide a list of scoped VMs in the form of a CSV file located in the same directory as the script.
    3a) The VM Name(s) must be listed beneath a column heading titled "Name". (i.e., Cell A1 should say "Name" and cells A2 and below should contain VM names)
 4) The VM name(s) must match according to vCenter, not the DNS hostname if different.

.NOTES
#>Lines 25-32
We begin by configuring a PowerShell function for timekeeping. This will help record the date and time for each line of our log file. We then set the location where the log should be saved, which is the same directory as the script in this case. Finally, we instruct PowerShell to stop/halt if it encounters an error, which is more of a safety mechanism.
# Prepare Logging
function Get-TimeStamp {
    return "[{0:MM/dd/yy}  {0:HH:mm:ss}]" -f (Get-Date)
}
$outputLog = ".\vm_hardware_upgrade.log"

# Set PowerShell to stop on all errors
$ErrorActionPreference = "Stop"Lines 34-39
We specify the VM Hardware Compatibility version we intend to set as a baseline. In this case, I want to ensure my VMs are configured with Hardware Version 19, which requires a minimum hypervisor/host version of vSphere/ESXi 7.0.2 . Ensure the desired Hardware Version is specified with a “v” prefix, for example “v19”, as the script is expecting this format.
# Desired VM Hardware Version (Change as needed)
$desiredHardwareVersion = "v19"  # Example: "v19" for VMware ESXi 7.0.2 compatibility, referred to as vmx-19 in some documentation. Modify as needed.
$desiredVmxVersion = "vmx-$($desiredHardwareVersion -replace '[^\d]')"

# CSV file path for VM names
$csvFilePath = '.\vm_hardware_upgrade.csv'Lines 41-85
The script begins writing to our log file for audit and troubleshooting reasons. We also present the “main menu” to the user, which prompts for the Fully Qualified Domain Name (FQDN) of the target vCenter Server (i.e., myvcsa.local), followed by a set of privileged credentials. Finally, the script attempts to authenticate using the provided credentials.
## Initialize Script
Write-Output "$(Get-Timestamp) WARN: +++++++++++++++ Starting new session +++++++++++++++" | Out-File $outputLog -Append
Write-Output "$(Get-Timestamp) Initializing script." | Out-File $outputLog -Append

## Welcome message
Write-Host "############################################################################" -ForegroundColor Cyan
Write-Host "                  VMware Upgrade VM Hardware Version" -ForegroundColor Cyan
Write-Host "############################################################################" -ForegroundColor Cyan
Write-Host "`n"
Write-Host "Version: 1.0"
Write-Host "`n"
Write-Host "Objective:" -ForegroundColor Yellow
Write-Host "Orchestrate the VM Hardware Compatibility upgrade process by setting the VM to upgrade on next power cycle."
Write-Host "`n"
Write-Host "Requirements:" -ForegroundColor Yellow
Write-Host "  * CSV file named 'vm_hardware_upgrade.csv' located in the working directory."
Write-Host "  * Cell A1 value should equal 'Name' with VM Names on separate cells below."
Write-Host "`n"
Write-Host "`n"

## Connect to the vCenter
Write-Host "######################################" -ForegroundColor Yellow
Write-Host "        vCenter Authentication" -ForegroundColor Yellow
Write-Host "######################################" -ForegroundColor Yellow
Write-Host "`n"
Write-Host "Specify the FQDN of your vCenter Server below:" -ForegroundColor Yellow
Write-Output "$(Get-Timestamp) Waiting for user input - VCSA." | Out-File $outputLog -Append
$vCenterServer = Read-Host "Enter your vCenter FQDN"
Write-Output "$(Get-Timestamp) User provided vCenter FQDN of $vCenterServer." | Out-File $outputLog -Append
Write-Host "`n"
Write-Output "$(Get-Timestamp) Waiting for user credentials." | Out-File $outputLog -Append
Write-Host "Please enter your credentials below:" -ForegroundColor Yellow
$vCenterUser = Read-Host "Enter your username"
$vCenterPass = Read-Host "Enter password" -AsSecureString
try {
    Write-Host "`n"
    Write-Host "Authentication in-progress. Please wait." -ForegroundColor Cyan
    Write-Output "$(Get-Timestamp) Connecting to $vCenterServer as user $vCenterUser." | Out-File $outputLog -Append
    # Uncomment the -AllLinked argument below if you wish to scope all vCenter Server instances connected via Enhanced Linked Mode (ELM).
    $null = Connect-VIServer $vCenterServer <#-AllLinked#> -User $vCenterUser -Password ([Runtime.InteropServices.Marshal]::PtrToStringAuto([Runtime.InteropServices.Marshal]::SecureStringToBSTR($vCenterPass))) -ErrorAction Stop
    Write-Output "$(Get-Timestamp) Connection established to vCenter server $vCenterServer successfully." | Out-File $outputLog -Append
} catch {
    Write-Output "$(Get-Timestamp) Error: Failed to connect to vCenter Server. $_" | Out-File $outputLog -Append
    exit
}Lines 87-104
The script reads the contents of the CSV file and loops through each row (therefore, each provided VM) and checks to ensure it can be located on the target vCenter Server. If one or more VMs cannot be found, a message will be indicated in the console window and written to log. This does not mean the script will stop/halt – it will continue down the list until each of the specified VMs have been checked.
# Process VMs from CSV
try {
    Clear-Host
    # Read contents of CSV file.
    $vmList = Import-Csv -Path $csvFilePath
    # Loop through each row of the CSV file.
    foreach ($vm in $vmList) {
        $vmName = $vm.Name
        Write-Output "$(Get-Timestamp) Starting analysis of VM: $vmName." | Out-File $outputLog -Append
        Write-Host "Starting analysis of VM: $vmName." -ForegroundColor Cyan

        $vmView = Get-VM -Name $vmName -ErrorAction SilentlyContinue
        # Check if VM exists in the target vCenter Server.
        if ($null -eq $vmView) {
            Write-Output "$(Get-Timestamp) Warning: VM named $vmName not found." | Out-File $outputLog -Append
            Write-Host "VM named $vmName not found." -ForegroundColor DarkRed
            continue
}Lines 106-113
Naturally, we don’t want to attempt an upgrade on VMs which are already configured with the specified Hardware Version or higher. This code block queries the scoped VM (recall, the script will loop through each VM specified in the CSV) for the corresponding Hardware Version. The version configured for the VM at present is written to the PowerShell terminal and log file. Finally, the script extracts just the numerical part of the Hardware Version, which is referenced shortly.
        # Check current VM Hardware version for the scoped VM.
        $currentHardwareVersion = $vmView.HardwareVersion
        Write-Output "$(Get-Timestamp) Current Hardware Version for $vmName is $currentHardwareVersion." | Out-File $outputLog -Append
        Write-Host "Current Hardware Version for $vmName is $currentHardwareVersion."

        # Extract numerical part of the hardware version.
        $currentVersionNumber = [int]($currentHardwareVersion -replace '[^\d]', '')
$desiredVersionNumber = [int]($desiredHardwareVersion -replace '[^\d]', '')Lines 115-143
The “real work” begins: The script will check if the current Hardware Version is less than the desired version. If so, the vCenter Server is instructed to set a flag on the VM to upgrade at next power cycle. If the current Hardware Version for the specified VM already meets the criteria, meaning its Hardware Version is greater than or equal to the desired version, then no action will be taken and the VM is simply skipped. In the event of an error, a message will appear in the PowerShell terminal and written to log, and the script will proceed to the next VM, if applicable. Lastly, the script will disconnect the user PowerCLI session once all tasks are complete.
        # If VM hardware upgrade is necessary, set upgrade flag to execute on next power cycle, which can be soft via Guest OS reboot.
        if ($currentVersionNumber -lt $desiredVersionNumber) {
            Write-Output "$(Get-Timestamp) Upgrading hardware version of $vmName from $currentHardwareVersion to $desiredVmxVersion." | Out-File $outputLog -Append
            Write-Host "Upgrading hardware version of $vmName from $currentHardwareVersion to $desiredVmxVersion." -ForegroundColor Yellow
            $UpgVMH = New-Object -TypeName VMware.Vim.VirtualMachineConfigSpec
            $UpgVMH.ScheduledHardwareUpgradeInfo = New-Object -TypeName VMware.Vim.ScheduledHardwareUpgradeInfo
            $UpgVMH.ScheduledHardwareUpgradeInfo.UpgradePolicy = [VMware.Vim.ScheduledHardwareUpgradeInfoHardwareUpgradePolicy]::onSoftPowerOff
            $UpgVMH.ScheduledHardwareUpgradeInfo.VersionKey = $desiredVmxVersion
            $UpgVMH.Tools = New-Object VMware.Vim.ToolsConfigInfo
            $UpgVMH.Tools.ToolsUpgradePolicy = "UpgradeAtPowerCycle"
            $vmView.ExtensionData.ReconfigVM_Task($UpgVMH) | Out-Null
            Write-Output "$(Get-Timestamp) Set upgrade flag for $vmName. VM will upgrade on next power cycle." | Out-File $outputLog -Append
            Write-Host "Set upgrade flag for $vmName. VM will upgrade on next power cycle." -ForegroundColor DarkGreen
            Write-Host "`n"
        } else {
            Write-Output "$(Get-Timestamp) No upgrade needed for $vmName (current version: $currentHardwareVersion)." | Out-File $outputLog -Append
            Write-Host "No upgrade needed for $vmName (current version: $currentHardwareVersion)." -ForegroundColor DarkGreen
            Write-Host "`n"
        }
    }
} catch {
    Write-Output "$(Get-Timestamp) Error processing VMs: $_" | Out-File $outputLog -Append
    Write-Host "Error processing VMs: $_" -ForegroundColor DarkRed
} finally {
    # Disconnect the vCenter session
    Disconnect-VIServer -Server $vCenterServer -Confirm:$false
    Write-Output "$(Get-Timestamp) Disconnected vCenter session." | Out-File $outputLog -Append
    Write-Host "Disconnected vCenter session. Please close terminal window." -ForegroundColor Green
}