Estimated reading time: 11 minutes

Engineers often face the challenge of managing data in ways that surpass the capabilities of Graphical User Interfaces (GUIs) or conventional scripting, particularly when factoring priorities such as speed and security. Aria Automation, like many modern platforms, supports a range of API interactions. While I plan to explore various API requests in future posts, today’s discussion focuses on kickstarting your journey with the Aria Automation API – specifically, the process of obtaining Refresh and Access Tokens.
Prerequisites
- In this post, I will use the Postman API client to handle sending API requests and parse the output. There are many tools which can achieve similar results, but Postman has gained popularity over the years and performs well.
- Postman is free for individuals and small teams of three or less, at the time of this article. Paid subscriptions are available for users with more advanced needs. You can find more details regarding free and paid service offerings from the Postman Blog.
- Although you can download, install, and launch Postman without creating an account, you will have sacrificed a few useful features, such as synchronizing settings and workspaces between devices, among others. Most notably, I found that I could not create an “Environment” without an account, which prevented me from using environment variables effectively. You can read more about the benefits of creating an account from the Postman Website.
- Postman is free for individuals and small teams of three or less, at the time of this article. Paid subscriptions are available for users with more advanced needs. You can find more details regarding free and paid service offerings from the Postman Blog.
- The API requests documented in this post have been executed against Aria Automation version 8.16. The API framework can evolve between application versions, so keep this in mind if you encounter issues.
Obtain a Refresh Token
Once you have Postman installed, we can begin. At this point, I have not logged-in with my Postman account yet – we will take a closer look at that shortly.
First, we will build a basic API POST request to obtain our Refresh Token. Notice that when launched, Postman opens a new “Untitled Request” tab automatically. Configure the following parameters for the request:
| Parameter | Value |
|---|---|
| Method | POST |
| URL | https://{{va-fqdn}}/csp/gateway/am/api/login?access_token |
| Authorization | None (Inherit auth from parent) |
| Headers | Accept: application/json Content-Type: application/json |
| Body | { "username": "{{username}}", "password": "{{password}}", "domain": "{{domain}}" } |
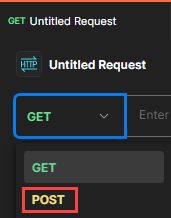
Start by clicking on the request method drop-down menu, which defaults to “GET” automatically. Click on “POST” from the list of options.
Click inside the “Enter URL or paste text” field, located to the right of the request method you just selected. Type or paste the below and replace “%vra-fqdn%” with the FQDN of your Aria Automation instance (i.e., https://aria-automation.mydomain.local)%vra-fqdn%/csp/gateway/am/api/login?access_token

The “Params” tab, located just below the URL field should be selected by default. Notice that the “access_token” parameter was added automatically once the URL was provided, and the value is empty.
Click on the “Authorization” tab and notice the “Type” is set to “No Auth“. This is informational only – we do not need to change this setting for this activity.
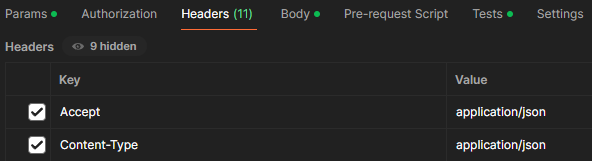
Click on the “Headers” tab. Notice the key value pair boxes are empty. Populate two rows with the below:
| Key | Value |
|---|---|
| Accept | application/json |
| Content-Type | application/json |
Click on the “Body” tab. Using the radio buttons below, tick the “raw” radio button. Notice that a text field appears beneath. Type or paste the below into the “Body” field. Replace the “%username%” and “%password%” values with the credentials you intend to authenticate with. Note that if you intend to authenticate with a domain account, you should not append the “domain\” prefix to the user name.
{
"username": "%username%",
"password": "%password%"
}
Click on the “Send” button to execute your API POST request.
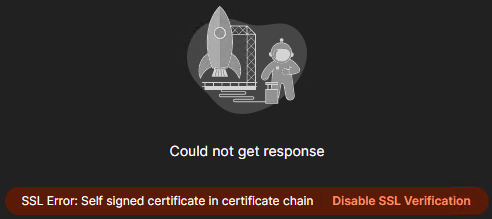
Depending on your Aria Automation environment, you may not have an internally signed SSL certificate bound to the application. If this is the case, Postman may return an error, “SSL Error: Self signed certificate in certificate chain“. If this is expected or acceptable for you, then simply click on the “Disable SSL Verification” link to proceed. This is a potential security risk, so exercise your own discretion to determine if this is acceptable. Given that I am running a lab environment, I have no concerns with bypassing SSL Verification and will click on the link to proceed.
Having clicked on the “Disable SSL Verification” link to proceed, the API POST request was re-sent automatically. Notice that the Response Pane located on the bottom-half of the page indicates the body of the API response, which contains the Refresh Token.

If you logged-into Postman with an account, you can leverage some additional benefits and capabilities, such as environment variables. Most of the steps above are still valid, but we can take it a step further.
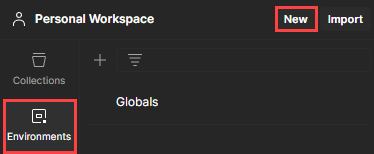
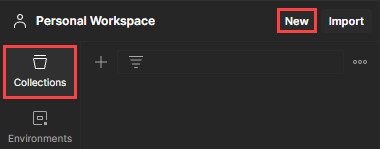
Click on the “Environments” button, located on the left-side of the page, then click on the “New” button, located to the right.
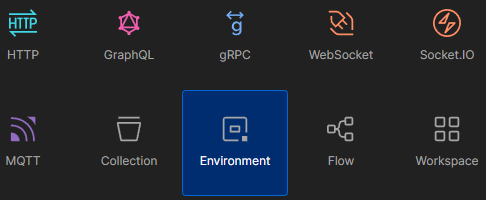
Click on the “Environment” button from the menu which appears.
Notice that the “New Environment” tab opens and appears on the left-side pane. Right-click on the “New Environment” object in the left-side pane, then click on the “Rename” menu option. Type a meaningful name for your Environment (i.e., vRA-Lab), then press the “Enter” key.
Notice that a Variables table appears below. Add the following variables, leaving the “type” set to “default” and the “Initial Value” and “Current Value” fields empty.
| Variable | Type | Initial Value | Current Value |
|---|---|---|---|
| refresh_token | default |

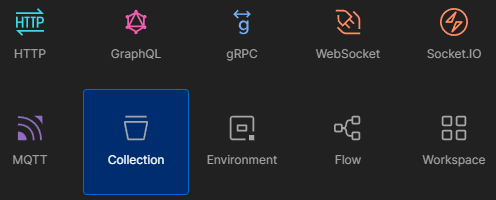
Click on the “Collections” button located on the left side of the page. If you logged-into Postman with an account from the beginning, you likely created a Workspace and Collection already. If you would like to create a new Collection to help organize your requests, simply click on the “New” button located to the right of your Workspace, then click on the “Collection” button.
Assign a meaningful name to your Collection by hovering your mouse over the Collection object inside the left-side pane, then click on the three dots (…) icon to the right of the object, and click on the “Rename” menu item. Type a name of your choosing, then press the “Enter” key.
If the API POST request we created above is not located inside of the new Collection, simply click and drag the request so that it is dropped inside the Collection.
Click on your new Collection from the left-side pane, then click on the “Variables” tab which appears. These variables we are about to define may be referenced by all child objects of the Collection, which can save us some time in development. Add the following variables inside the table. Note that the “Current Value” fields will automatically reflect the values provided inside the “Initial Value” fields.
| Variable | Initial Value |
|---|---|
| vra-fqdn | https://vra-lab.mydomain.local |
| username | myUserAccount |
| password | myPassword |
| domain | mydomain.local |
Click on the “Save” button, located at the top-right of the window.
Return to your API POST request by clicking on it from the left-side pane. Modify the Request URL by removing your Aria Automation FQDN and replace with the below:{{vra-fqdn}}/csp/gateway/am/api/login?access_token
As you may suspect, the API Request will now reference the FQDN supplied within the environment variable, which we have wrapped in curly braces above.
Click on the “Body” tab and replace the existing text with the below:
{
"username": "{{username}}",
"password": "{{password}}"
}
Notice that once again, we are referencing environment variables, which can save us time.
Since we authenticated to Postman with an account, we can also leverage “Tests” to extract the Refresh Token from our API Response and automatically append the result to an environment variable.
Click on the “Tests” tab, located beneath the API Request URL. Paste the below into the text field which appears beneath the tab.
var response = pm.response.json();
pm.environment.set("refresh_token", response.refresh_token);Remember when we created the “refresh_token” variable as we created a new Environment? This is where the Refresh Token will be stored automatically, per the above code.
Click on the “Send” button to execute the API POST request once again. Notice that just as before, the Result Pane below indicates a Refresh Token was returned.
Click on the “Environments” button, then click on your Environment. Notice that the “refresh_token” variable now has a “Current value” which matches the new Refresh Token! If your Refresh Token is not visible in this view, close the tab for this Environment and click on the Environment once again from the left-side pane.
Obtain an Access Token
Now that we have generated a Refresh Token, we may obtain an Access Token. I will first provide instructions under the assumption that you have not logged-into Postman with an account, then provide updated instructions, just as before.
First, click on your Collection from left-side pane – just to set our working directory. Next, click on the “New” button, then click on the “HTTP” button to create a new HTTP-Based API Request. The “Untitled Request” tab opens.

Click on the request method drop-down menu, which defaults to “GET” automatically. Click on “POST” from the list of options.
Click inside the “Enter URL or paste text” field, located to the right of the request method you just selected. Type or paste the below and replace “%vra-fqdn%” with the FQDN of your Aria Automation instance (i.e., https://aria-automation.mydomain.local)%vra-fqdn%/iaas/api/login

Click on the “Authorization” tab and notice the “Type” is set to “No Auth“. This is informational only – we do not need to change this setting for this activity.
Click on the “Headers” tab. Notice the key value pair boxes are empty. Populate two rows with the below:
| Key | Value |
|---|---|
| Accept | application/json |
| Content-Type | application/json |
Click on the “Body” tab. Using the radio buttons below, tick the “raw” radio button. Notice that a text field appears beneath. Type or paste the below into the “Body” field. Replace the “%my_refresh_token%” value with the Refresh Token you obtained in the last section.
{
"refreshToken": "my_refresh_token"
}

Click on the “Send” button to execute your API POST request. The Response Pane below returns an Access Token!

Just as before, if you logged-into Postman with an account, you can reference environment variables and use Tests to automate population of the Access Token into the respective variable. Here is the modified request to take advantage of these capabilities:
Return to your API POST request by clicking on it from the left-side pane. Modify the Request URL by removing your Aria Automation FQDN and replace with the below:{{vra-fqdn}}/iaas/api/login
As you may suspect, the API Request will now reference the FQDN supplied within the environment variable, which we have wrapped in curly braces above.
Click on the “Body” tab and replace the existing text with the below. Note that we are passing the Refresh Token generated in prior steps, not a username and password:
{
"refreshToken": "{{refresh_token}}"
}
Notice that once again, we are referencing environment variables, which can save us time.
Click on the “Tests” tab, located beneath the API Request URL. Paste the below into the text field which appears beneath the tab.
var response = pm.response.json();
pm.environment.set("access_token", response.token);Click on the “Save” button to ensure you do not lose any changes, then click on the “Environments” button, located in the left-side pane. Click on your Environment from the list of options to select.
Notice that only the “refresh_token” Variable appears. Add a new row which matches the following, then click on the “Save” button:
| Variable | Type | Initial Value | Current Value |
|---|---|---|---|
| refresh_token | default | ||
| access_token | default |

Click on the “Send” button to execute the API POST request once again. Notice that just as before, the Result Pane below indicates an Access Token was returned.
Click on the “Environments” button, then click on your Environment. Notice that the “access_token” variable now has a “Current value” which matches the new Access Token! If your Access Token is not visible in this view, close the tab for this Environment and click on the Environment once again from the left-side pane.
Additional Resources
Aria Automation API Programming Guide – VMware Developer Portal
https://%Your_vRA_FQDN%/automation-ui/api-docs/ – Local API Documentation
Modify this URL by replacing “%Your_vRA_FQDN%” with the FQDN of your Aria Automation instance.
Wrapping-Up
We covered a lot of ground on this post! As you can see, the most value is derived when using a Postman account to activate most features of the platform, but this may not be possible or desired based on your organization’s security requirements. Per usual, there are a variety of products or solutions which can perform the same tasks, commonly with different settings and methods. I encourage you to exercise your own discretion to determine what is most appropriate for your environment and find what works best for you.