Estimated reading time: 6 minutes

The beauty of Aria Automation (formerly vRealize Automation – VRA) lies in its boundless potential. With Automation, you can create Actions and Workflows to achieve countless outcomes, limited only by your imagination. Getting started with Automation is usually low-risk; we often begin by deploying virtual machines, creating snapshots, and executing daily scripts. The natural progression leads to focusing on Day Two Actions and ultimately removing resources. In fact, Day Two Actions and resource deprovisioning are integral to fulfilling the standard lifecycle through Automation. However, modifying or deleting deployments carries more risk, with a slimmer margin for error.
This post aims to mitigate an unavoidable risk: human error. While human error can’t be completely avoided, we can reduce it through various technical controls. Here, the control is a simple test of the user’s attention. In the modern workplace, where interruptions are frequent, user interfaces share common appearances, and time constraints are ever-present, it’s easy for users to make mistakes. This control acts as a “digital speed bump,” helping users pause and consider whether the action they are about to execute truly reflects their intent. We’ll use a Service Broker Custom Form which prompts the user to type a word that catches their attention: “ERASE.” This required field ensures that the user must attest to their intent to remove a deployment before proceeding.
Getting Started
First, we need to launch Service Broker and select a Custom Form.
- Using a web browser of choice, launch Aria Automation and navigate to Service Broker as needed.
- Click on the “Content & Policies” tab, located along the top ribbon.

- Click on the “Content” menu item, located within the left-side navigation pane.

- Locate the Cloud Template or Automation Orchestrator Workflow you wish to modify. Keep in mind, you are simply modifying the Custom Request Form – not the Cloud Template or Orchestrator Workflow itself.
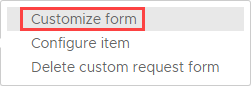
- Once identified, click on the “three vertical dots” icon, to the left of the content name, then click on the “Customize Form” menu item which appears.

Next, we must create a “Text Field” and configure input validation.
- Locate the “Generic Elements” heading, located on the left-side pane.
- Click and Drag the “Text Field” item onto the Canvas. Don’t worry about the exact placement, you can easily move it later.

- Click on the new “Text Field” box, which is located on the Canvas. Notice the right-side pane now displays the “Text Field” heading, with a series of options beneath.
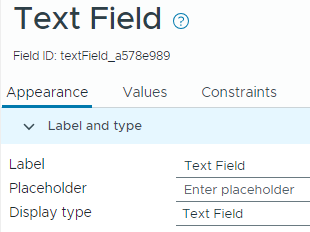
- Click inside the “Label” field, and type a name which is meaningful and indicates the field’s purpose. This label is visible to the end-user, so avoid technical jargon where possible. In this example, the label is simply “Confirm Action“. Notice the label is now reflected on the canvas.
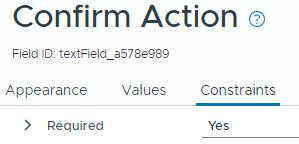
- Click on the “Constraints” tab, located beneath the “Text Field” heading on the right-side pane.
- Locate the “Required” drop-down box, located just beneath the heading. Click on it, then click on the “Yes” option. This will require the user to supply a value inside the text box, but we have not yet restricted which values are acceptable.
- Click inside the “Regular Expression” box, located beneath the “Text Field” heading on the right-side pane.
Regular Expressions are powerful and can be configured to match various criterion. Despite the name, there’s nothing “regular” about them – in fact, most Administrators and Engineers struggle to design them at all. I will include a couple of resources at the end of this article which can help in this respect, but for now, we will focus on the task at hand: input validation for this field should only be satisfied if the user types “ERASE” inside the text box, which is case sensitive.
Copy and paste the Regular Expression below into the “Regular Expression” field:^ERASE$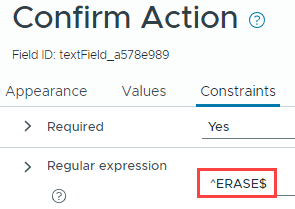
Although likely among the shortest lines of RegEx you have ever seen, it’s all we need for this use case. - Click on the “Save” button, located at the bottom-left corner of the window. If this is the first custom form you have created for this specific workflow, then you must also click on the “Enable” button, located along the top ribbon, else the custom form will remain in a “draft” state.
Testing
Having created, enabled, and saved your Custom Form, navigate back to the Service Broker Catalog by clicking on the “Consume” button, located along the top ribbon. Locate the appropriate tile/request item, and click on the “Request” button to launch the custom form.
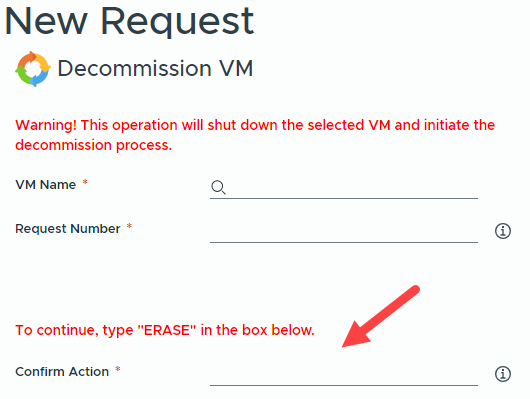
As you can see, the “Confirm Action” text box is visible and the red asterisk denotes that it is considered a required field. Give it a try – Do you receive an input validation error when you type “DELETE” inside the text field? What about “ERAES” (misspelled intentionally)? Finally, type “ERASE”, and notice that the field requirements are now satisfied.
Learn More about RegEx
Regular Expressions (RegEx) are common and can be complex to understand with the naked eye. Those responsible for designing custom forms should also perform thorough validation of the RegEx code before implementing in Production, which can require “trial and error” in the absence of a validation utility. Below are a couple of helpful resources I have used in the past to learn about RegEx and test my patterns prior to implementation:
RegExr – https://regexr.com
Open source HTML/JS based tool for creating, testing, and learning about Regular Expressions. Provides a validation engine (“Tests”) which allows the user to provide their own custom RegEx string in addition to one or more values to validate against. RegExr will report a Pass/Fail result based on evaluation in real-time. RegExr also provides a RegEx Cheatsheet and Reference Guide to help users learn more about Regular Expressions. There is even a “Community Patterns” section where registered users have contributed their own patterns for you to reference!
regex101 – https://regex101.com
Comparable to RegExr, regex101 provides a validation engine for Regular Expression patterns and breaks-down each validation step. This is a highly customizable web-based utility which also provides a library of Regular Expressions curated by their online community.
love it!