Estimated reading time: 7 minutes

During a recent troubleshooting session, my team noticed an unusual and alarming spike in DNS requests, to the tune of roughly five million queries per day, from two vSphere Hosts trying to resolve the IP address of their third cluster member. Upon investigation, we found that the etcd service on the third Host was rejecting connections, even though no firewall restrictions were in place. While this issue may seem obscure, the underlying cause turned out to be relatively straightforward. In this post, I will walk through how we pinpointed and resolved the problem in hopes it can guide others facing a similar challenge.
Update
Broadcom Engineering has acknowledged this issue and advised that a programmatic fix will be delivered with the next ESXi patch, likely arriving within the next 1-2 months as of April 2025).
Symptoms
- DNS Server reports may indicate excessive (~5 million) DNS requests for the Fully Qualified Domain Name (FQDN) of a single vSphere/ESXi Host with the queries being created by peer Hosts in the same vSphere Cluster.
- The following errors may appear in the etcd log file (/var/log/etcd.log):
2025-02-02T12:49:04Z esxi0001.domain.local etcd[9048502]: cannot get the version of member f9f5200d2029a7ac (Get "https://esxi0002.domain.local:2380/version": dial tcp 192.168.1.114:2380: connect: connection refused)

2025-02-02T12:49:04Z esxi0001.domain.local etcd[9048502]: failed to reach the peerURL(https://esxi0002.domain.local:2380) of member f9f5200d2029a7ac (Get "https://esxi0002.domain.local:2380/version": dial tcp 192.168.1.114:2380: connect: connection refused)

2025-02-02T12:12:42Z esxi0001.domain.local etcd[9048502]: cannot get the version of member f9f5200d2029a7ac (Get "https://esxi0002.domain.local:2380/version": dial tcp: lookup esxi0002.domain.local: i/o timeout)

2025-02-02T12:12:42Z esxi0001.domain.local etcd[9048502]: failed to reach the peerURL(https://esxi0002.domain.local:2380) of member f9f5200d2029a7ac (Get "https://esxi0002.domain.local:2380/version": dial tcp: lookup esxi0002.domain.local: i/o timeout)
Related Factors
- The vSphere/ESXi Host which cannot be contacted (
esxi0002) was previously migrated from a different vSphere Cluster or vCenter Server. This may have been achieved recently or some time ago. - Although possible in larger clusters, this condition is most evident in three-node clusters.
Research and Review of Documentation
Despite a broad online search for clues as to what may have caused this issue, I turned up empty handed. Following engagement with Broadcom Support, it was determined that although a bit obscure, this is a known condition. This condition is not exclusive to three-node clusters but seems most prevalent in such environments. We also observed that this issue was not present in vSphere 7.x but appeared after upgrading the environment to vSphere 8.x.
Solution Assessment
In our case, the solution involves purging the configuration files associated with the clusterAgent service, then allowing the files to regenerate once reconnected to the parent vCenter Server. Although instructions are provided below, I highly recommend taking every possible precaution which applies to your environment and gain insight from Broadcom Support prior to implementation.
First, enable the SSH Service on the scoped Host, as needed. In this case, the scoped host refers to esxi0002.
Using a terminal emulator of choice (i.e., PuTTY), launch an SSH terminal session to the scoped Host and authenticate using the root user credentials.
Execute the command below to check the status of the clusterAgent service. The output will simply indicate whether the clusterAgent service is in a running state:
/etc/init.d/clusterAgent statusExecute the command below to check the status of the associated cluster. The expected output will indicate whether the Host is operating in “standalone” mode and whether peer Hosts are visible to the clusterAgent service:
/usr/lib/vmware/clusterAgent/bin/clusterAdmin cluster status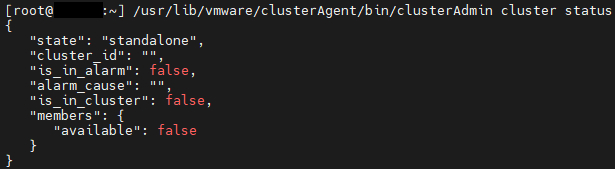
Using a web browser of choice, browse to the parent vCenter Server web interface and authenticate with a user account privileged to manage Host objects.
Within the vCenter Web UI, right-click on the scoped Host object, click on the “Connection” menu item, then click on the “Disconnect” menu item. Click on the “Ok” button when prompted for confirmation.
Return to the Terminal Emulator window and execute the command below to retrieve a list of the configuration files associated with the clusterAgent service:
configstorecli files datafile get -c esx -k cluster_agent_data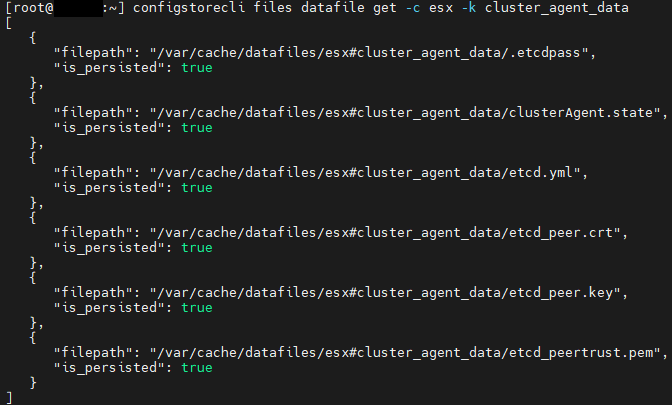
Execute the command below to change working directories to the location of the configuration files:
cd /var/cache/datafiles/esx#cluster_agent_data/Execute the command below to list each file:
ls -larth(Recommended) Identify a datastore which can be used temporarily to store a backup of the existing clusterAgent service configuration files. If possible, create a new directory on the datastore to keep these files separate from others. For example, if the Host name is esxi0002, create a directory named “esxi0002_backup”.
Execute the command below to list the mounted storage volumes on the Host:
ls /vmfs/volumes/ -ltrhExecute the command below to copy the current clusterAgent configuration files to the backup directory. Note that the directory name should be updated to reflect the scoped host name:
cp * /vmfs/volumes/datastore_01/esxi0002_backup/Execute the command below to copy the current “etcdpass” file to the backup directory. Note that the directory name should be updated to reflect the scoped host name:
cp .etcdpass /vmfs/volumes/datastore_01/esxi0002_backupExecute the command below to confirm the files were copied successfully. Note that the directory name should be updated to reflect the scoped host name:
ls /vmfs/volumes/datastore_01/esxi0002_backup/ -ltrh
Execute the command below to change working directories to the root:
cd /Warning!
The next steps will remove the clusterAgent configuration files from the scoped Host. It is highly recommended that you capture a backup of these files before proceeding. This is an advanced operation which should be applied under the direction of Broadcom Support.
Execute the command below to delete the current clusterAgent configuration files:
configstorecli files datafile delete -c esx -k cluster_agent_data
Execute the command below to delete the current clusterAgent configuration directory:
configstorecli files datadir delete -c esx -k cluster_agent_data
Return to the vCenter Web UI, then reconnect the Host to the vCenter server.
Execute the command below to check the status of the clusterAgent service. If the status reports that the service is not running, wait a few moments and try again.
/etc/init.d/clusterAgent statusExecute the command below to retrieve a list of the configuration files associated with the clusterAgent service:
configstorecli files datafile get -c esx -k cluster_agent_data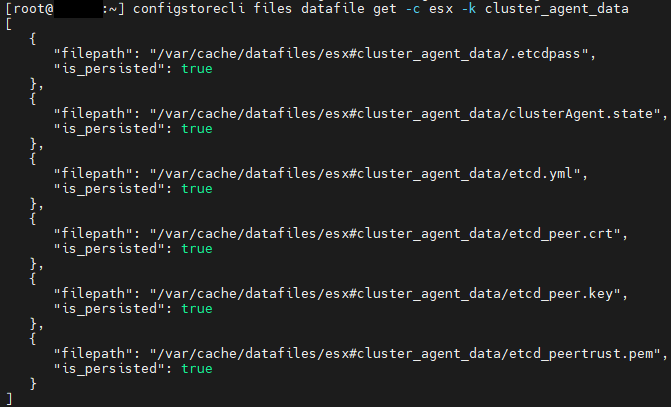
Execute the command below to check the status of the associated cluster:
/usr/lib/vmware/clusterAgent/bin/clusterAdmin cluster status
At this point, the issue should be addressed: DNS queries should no longer be excessive for this host FQDN and the etcd failure log messages should cease. Continue to monitor log messages and DNS Query reports as needed to validate success.
Hi there,
Thanks a lot for this article, it can definitivelly help anybody! 😉
I run into the same issue and what I’ve done today before going through this complicated process is “just” rebuilt a new cluster if you can.
In my homelab with 3 hosts, I did put one host in maintenance after the other, taking special care to remove host profile and any configuration prior putting it into new cluster. Then I started to move VMs group by group until then end. Adding one host whenever required.
And when I was done, I reactivated HA. I had a doubt because I still saw a lot of DNS queries but it was way lower and then, it stopped and was back to normal.
So rebuilding a cluster might be another solution if you are not confident with command lines like me! 🙂
Thanks again