Estimated reading time: 7 minutes

Building Custom Forms in VCF Automation (formerly Aria Automation) Service Broker is one of the most rewarding aspects of designing automated solutions. At this stage, you you have finally reached the tip of the pyramid: the Presentation Layer! Service Broker Forms define how the end-user interacts with your solution, empowering you to flex those UI/UX Design muscles – and it makes a tremendous difference for the end user experience.
You may already be familiar with Service Broker Forms, but how would you handle input fields, such as dropdown menus, where the field values are too long to display correctly on-screen using the default field size? This is a common scenario where the Engineer/Administrator is left frustrated by the design experience: it shouldn’t be this difficult, right? We seldom have the luxury of shortening or re-naming field values simply because of a visual/presentation conflict, so what can be done? My team encountered this exact issue while building one of our forms, and we’re happy to share our work-around.
Although not a perfect solution, Broadcom KB 381335 discusses this issue and provides the basis for our work around. We were able to achieve most of our goal using the CSS code provided within the KB, but added additional code to correct a couple of concerns. Specifically, the downward facing chevron was overlapping with the value text when selected, in addition to the info icon (“signpost”) shifting to a second line beneath the field.
This workaround has worked well for our use case, but it may not be the perfect fit for everyone. There are often multiple ways to solve a design challenge, and I encourage you to share your solutions or improvements in the comments below. Let’s collaborate and make our forms better together!
Examine the Problem
In this scenario, I have a dropdown field named “Assigned Team” with multiple available values. Notice that the team with the longest value, “IT Systems Administration and Engineering” is cut off at the end. Our goal is to expand only this dropdown menu to accommodate the lengthy team name.

Identify CSS Elements
In order to successfully manipulate the appearance of the web page, we need to identify a few things first.
First, identify the Field ID. If the field was created within your Cloud Template (i.e., the “project” field), then the Field ID is likely the same as the “Label“. However, if you added the field in Service Broker by dragging a field element onto the canvas, the Field ID is randomly generated.
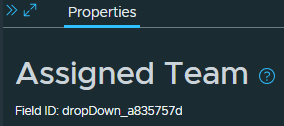
Using a web browser of choice, launch Service Broker and open the form you intend to work on from the Content & Policies menu. Click on the field which needs to be resized – in this case, the “Assigned Team” field. Notice the “Field ID” in the Properties Pane is “dropDown_a835757d“. Make a note of this Field ID, as we will reference it when creating our CSS file.

Second, identify the type of field in question. For example, the “Assigned Team” field is a drop down field, which is referred to as a “Select” field in CSS. Along similar lines, a simple text label (“Text” element in the Service Broker canvas) is referred to as a “label“.
Third, navigate to the Service Broker Catalog and open the request form as a user would – not for editing the form. Right-click on the field you wish to extend – in this case, the “Assigned Team” field, then click on the “Inspect” menu item to open your web browser’s Developer Tools pane.
Notice that as you move your mouse cursor up or down the lines of code, different elements on the web page are highlighted, often with a text box above the element. Move your mouse along the lines of code above the default selection until the web page shows your intended field (“Assigned Team” in this case) highlighted with green boxes on the left and right sides of the field. Once located, click where your cursor is located in the code block.

Make note of the text box located above the green and blue bars on the web page. In this case, “div.clr-col-6.ng-star-inserted“. This will be used in our CSS file.
Lastly, continue moving your cursor within the Developer Tools pane, scrolling up as needed. This time, we want to identify the entire row which contains the field label (“Assigned Team”) in addition to the value selection box. Stop moving your cursor once the entire row appears with a purple dotted/dashed box around it.

Make note of the text box located above the “Assigned Team” field on the web page. In this case, “dev.clr-row.cf-form-grid.cf-form-group“. This will be used in our CSS file.
Create New CSS File
Using a code editor of choice (i.e., VS Code, Notepad++, etc.) create a new (blank) file. If necessary, select the code language as CSS.
Copy and paste the CSS example below into the code editor. Update the field names as needed. For convenience, I have highlighted these sections in the code block.
/* Resize the Assigned Team Field */
#dropDown_a835757d select {
    width: auto;
    max-width: 350px;
    margin: 0;
    padding: 0;
    padding-left: 0;
    box-sizing: border-box;
    flex-grow: 1;
    padding-right: 2rem;
    display: inline-block;
  }

/* Resize the column to prevent the downward chevron from overlapping with text */
div.clr-col-6.ng-star-inserted {
    width: auto !important;
    max-width: 350px !important;
  }

/* Modify field row to prevent help button from appearing on second line */
div.clr-row.cf-form-grid.cf-form-group {
    display: flex;
    flex-wrap: nowrap;
}Line 2: Replace “dropDown_a835757d” with the Field ID recorded in the previous section.
Line 15: If needed, replace “div.clr-col-6.ng-star-inserted” with the element noted in the previous section (with the green boxes on either side of the field).
Line 21: If needed, replace “div.clr-row.cf-form-grid.cf-form-group” with the element noted in the previous section (with the purple dotted/dashed line around the row).
Save the file to your local workstation, ensuring that the file extension is “.css“.
Return to Service Broker and modify your request form. Click on the “Actions” button, located along the top ribbon, then click on the “Import CSS” menu item. Click to select the CSS file you created on your local workstation, then click on the “Ok” button. Finally, click on the “Save” button located at the bottom-left corner of the window.
Navigate back to the Service Broker Catalog and launch the request as a normal user would. Notice that the “Assigned Team” field is wider and no longer cuts off the value text!

Conclusion
CSS is very powerful but can become complex quickly, especially for those of us who do not work with it routinely – myself included. I would very much like to see Service Broker enhanced with a method to accommodate this concern directly within the UI in the future, but this work around has served us well.