Estimated reading time: 13 minutes

If you manage a vSphere environment of practically any size, virtual machine hardware version upgrades are a task you probably don’t look forward to. The process is straightforward enough for one or two VMs, but when you’re looking at hundreds of machines spread across multiple clusters and hosts, clicking through the vSphere or vCenter UI starts to feel monotonous. Add the coordination required around scheduled maintenance windows, snapshot management, and post-upgrade validation, and it’s the kind of work that tends to stay on the backlog longer than it should.
In preparation for upgrading my environment to VCF 9.1, I reflected back on a script I created a couple years ago which makes short work of VM hardware upgrades based on a user-defined input file. Although still credible, I knew that I could do better, especially with the help of AI. I partnered with Anthropic’s Claude Sonnet 4.6 model to create a new and improved PowerShell script to automate VM hardware version upgrades at scale, and it’s evolved quite a bit through real-world use. The script, Invoke-VMHWUpgrade.ps1, communicates directly with the vCenter REST and VI/JSON APIs, handles the full upgrade workflow from power-down through verification, and is built with the kind of concurrency control and failure isolation that makes it safe to run against production workloads, generally speaking. In this post I’ll walk through what the script does, how to use it, and some of the design decisions that make it worth reaching for when hardware version upgrades come up.
You can download the script from my GitHub repository. The only requirement is PowerShell 7.0 or later, which is an improvement over the last script in itself, as VCF PowerCLI is not required.
Get the Script
Download Invoke-VMHWUpgrade.ps1 free from my GitHub repository. PowerShell 7.0+ is the only requirement – no PowerCLI needed. [View on GitHub →]
Why Hardware Version Upgrades Matter
Virtual machine hardware versions define the set of virtual hardware features available to a guest OS. These features include things like NVMe controller support, additional vCPU limits, enhanced memory configurations, and security features like VM Encryption. Each release of ESX introduces a new hardware version, and VMs created on older versions don’t automatically gain access to those capabilities.
Environments targeting vSphere 8.0 or preparing for a VCF 9.x Workload Domain import, hardware version compatibility is a real requirement, not just housekeeping. VMX 20 through VMX 22 unlock features that workloads increasingly depend on, and having a fleet of VMs stuck at VMX 14 or VMX 17 creates an invisible ceiling on what those workloads can do.
A few important caveats of upgrading virtual hardware versions include that the VM must be powered off, upgrades are irreversible without restoring snapshots or backups, and upgrades need to be coordinated with snapshot management if you want a rollback path. When performed by hand, this is exactly the kind of low-stakes, high-volume work that drains staff resource time without adding visible value. Leveraging a script, it’s a simple scheduled maintenance window.
What the Script Does
Invoke-VMHWUpgrade.ps1 operates in two distinct modes:
Upgrade Mode runs a four-phase pipeline for each VM in scope:
- Power-Down — The script sends a Guest OS Shutdown via VMware Tools and waits for the VM to reach a powered-off state. If Tools isn’t running or the shutdown times out, it escalates to a forced Power Off, then a Hard Stop. Each VM works through this independently, so a single VM doesn’t block the rest of the batch.
- Snapshot (optional) — Once the VM is confirmed powered off, a crash-consistent snapshot is captured immediately before the upgrade command. This is your rollback path, in the event you need it. If the snapshot fails, the VM is excluded from the upgrade rather than proceeding without a rollback method.
- Hardware Version Upgrade — The script calls the
UpgradeVM_TaskVI/JSON API endpoint, waits for task completion, and then verifies the version via a follow-up query to confirm what vCenter’s inventory reflects. - Power-On (optional) — If you pass the
-AutoPowerOn(-apo) flag, VMs that were shut down by the script are powered back on after the upgrade. VMs that were already powered off when the run started are left off. The script only powers on what it powered down.
Cleanup Mode (-cs) is a separate run intended for after you have successfully validated the upgrades. It queries each VM’s snapshot tree, finds snapshots matching the prescribed name, and removes them concurrently with the same concurrency controls as the power phases.
Prerequisites and Getting Started
Before running the script, make sure the following are in place:
- PowerShell 7.0 or later
- vSphere 8.0 or 9.0. vSphere 7.x is not supported.
- A vCenter service account with the required privileges (covered below).
- A CSV or plain-text file listing the VM display names you want to scope, one per line.
If your vCenter Server uses a self-signed certificate, add the -k flag to bypass SSL validation. The script will attempt a standard connection first and automatically retry with validation disabled, but passing -k at the forefront avoids the unnecessary connection attempt.
Preparing Your VM List
Create a plain text or CSV file with one VM display name per line. Column headers like vmname, name, or vm are automatically detected and skipped if present.
db-prod-01
db-prod-02
app-prod-01
app-prod-02vCenter Permissions
The service account needs a custom role with the following privileges, assigned at the vCenter Server level with propagation enabled:
- Virtual Machine > Change Configuration: Upgrade virtual machine compatibility
- Virtual Machine > Interaction: Power Off, Power On
- Virtual Machine > Snapshot Management: Create snapshot, Remove Snapshot
All five privileges are within the Virtual Machine object type, so the role is straightforward to configure.
Running an Upgrade
A typical upgrade command looks something like this:
.\Invoke-VMHWUpgrade.ps1 -vc vcenter.corp.local -s vms.csv -tv VMX_22 -snap -k -r TableInspecting each parameter more closely:
Argument | Purpose |
|---|---|
| -vc vcenter.corp.local | Target vCenter server |
| -s vms.csv | Input file with VM names |
| -tv VMX_22 | Target hardware version |
| -snap | Capture a pre-upgrade snapshot for each VM |
| -k | Bypass SSL certificate validation |
| -r Table | Print results inline as a table after completion |
After running the command, the script will prompt for your vCenter username and password at the terminal, then work through a sequence of steps before touching anything:
- Detects the VI/JSON release schema from vCenter.
- Enumerates local ESX hosts (Linked Mode guard).
- Resolves every VM in your input file against the live vCenter inventory: collecting current hardware version, power state, host, and datastore.
- Classifies VMs as eligible for upgrade or already at/above target.
- Prompts for your snapshot preference if you didn’t pass
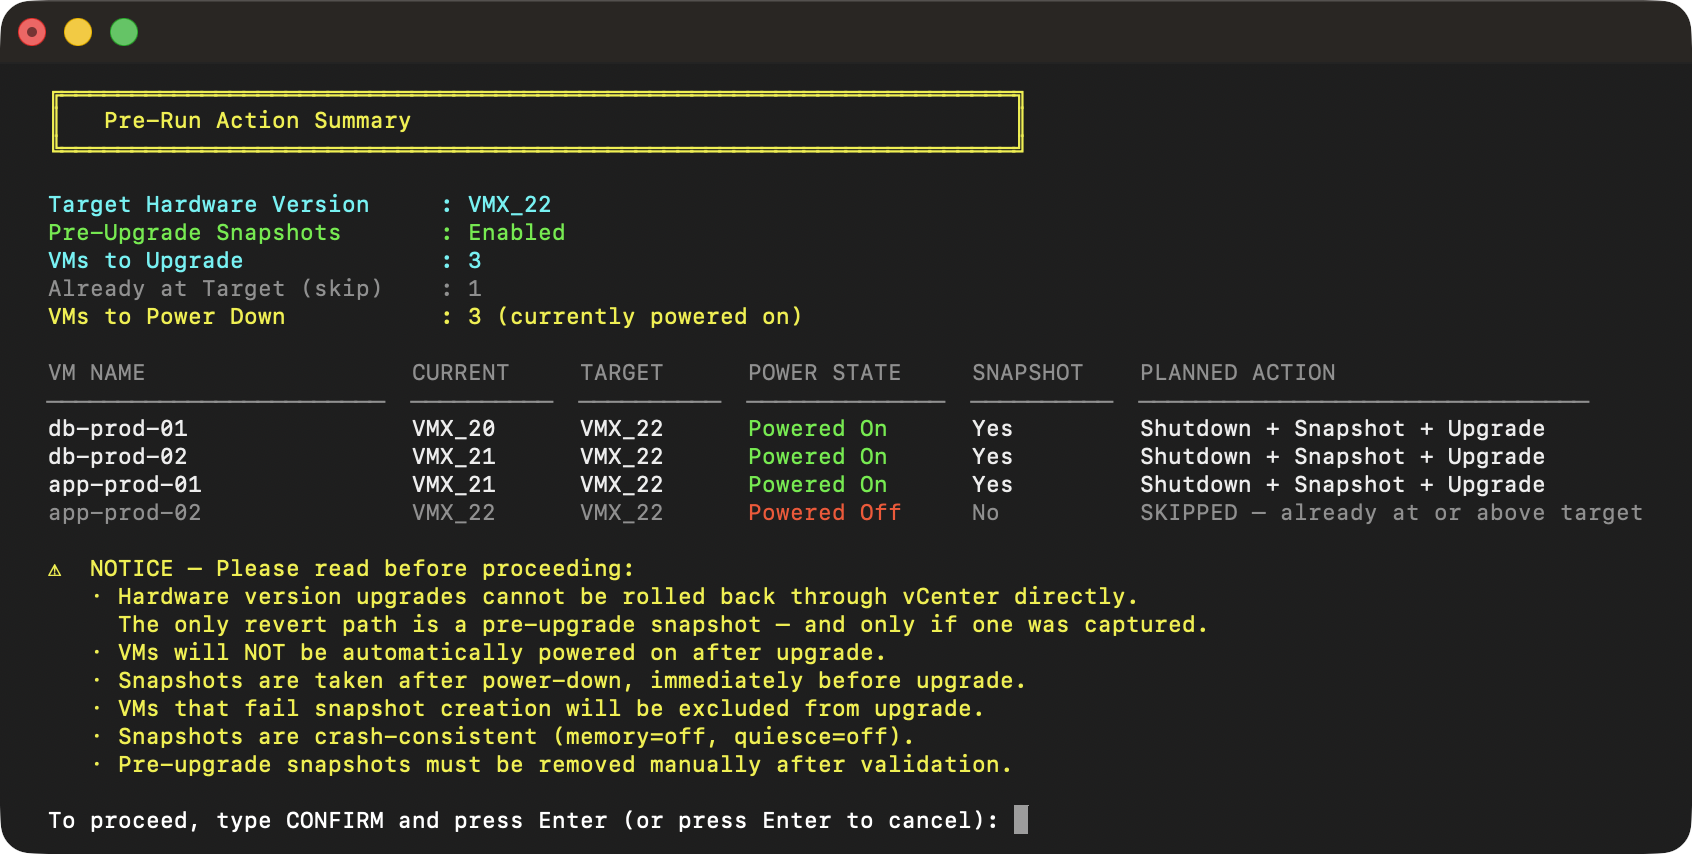
-snap. - Displays a full pre-run action summary and waits for you to type
CONFIRM.
Only after confirmation does the script begin executing. VMs that don’t exist in inventory, belong to a linked vCenter, or are identified as SRM/VLR placeholders are excluded automatically and listed separately.
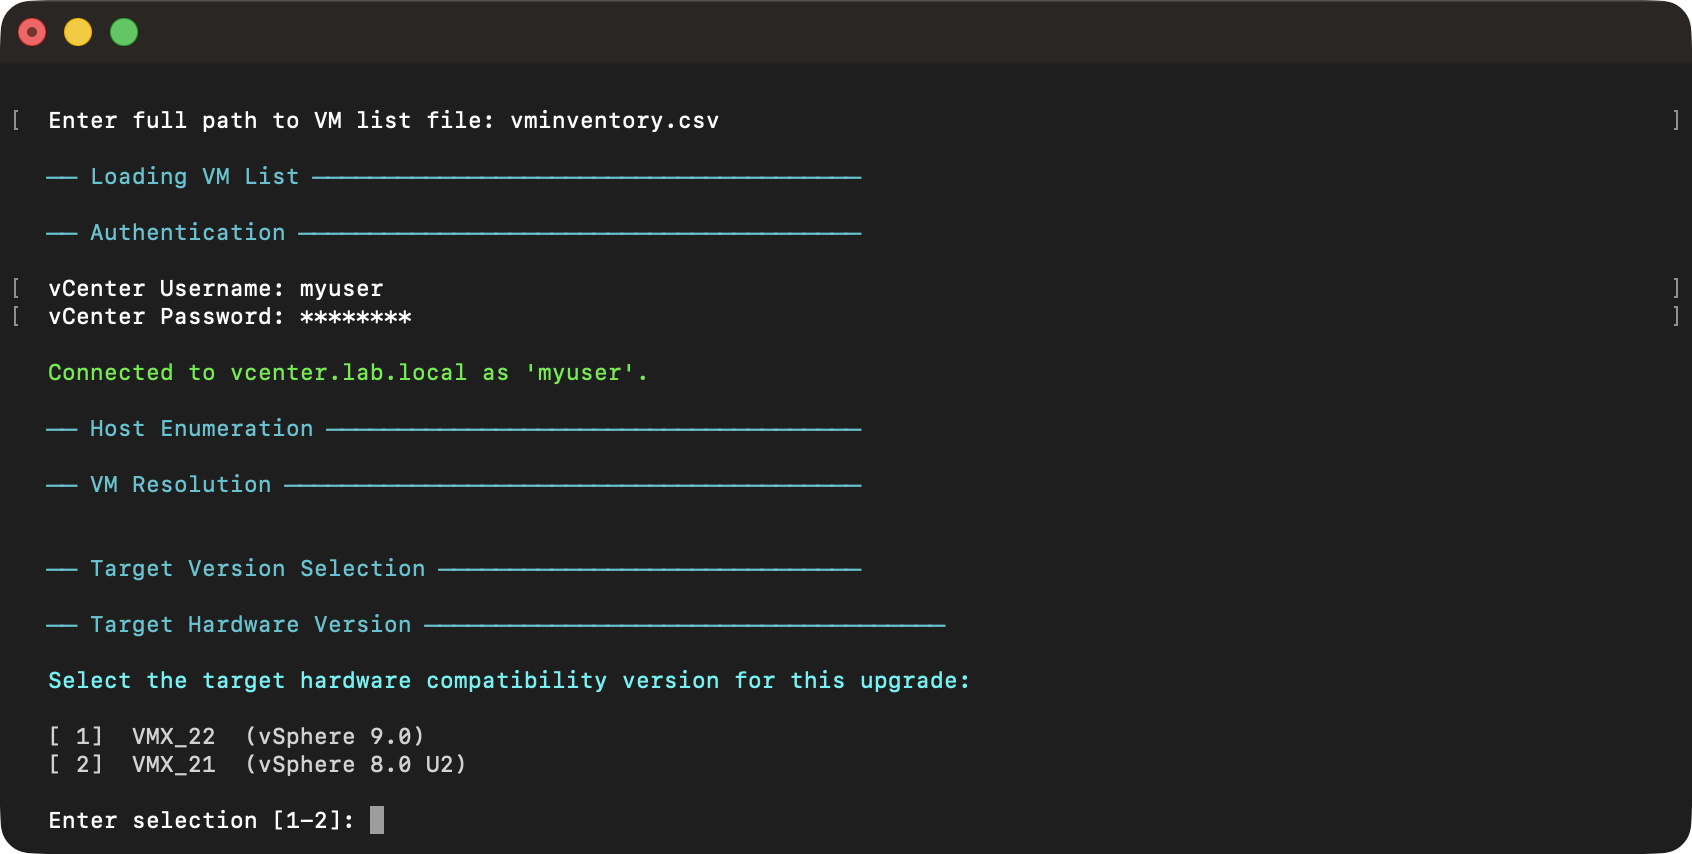
Selecting a Target Version
If you omit the -tv argument, the script displays an interactive menu after VM resolution. Versions are listed highest-to-lowest, and a selection is required. There is no default, so you make an explicit choice.
Watching it Run
Once confirmed, the concurrent power-down phase begins. The progress bar shows active and pending counts along with a rolling ETA based on average completion times observed so far in the run. VMs shut down quickly move on to snapshot and upgrade while slower ones continue their shutdown in parallel.
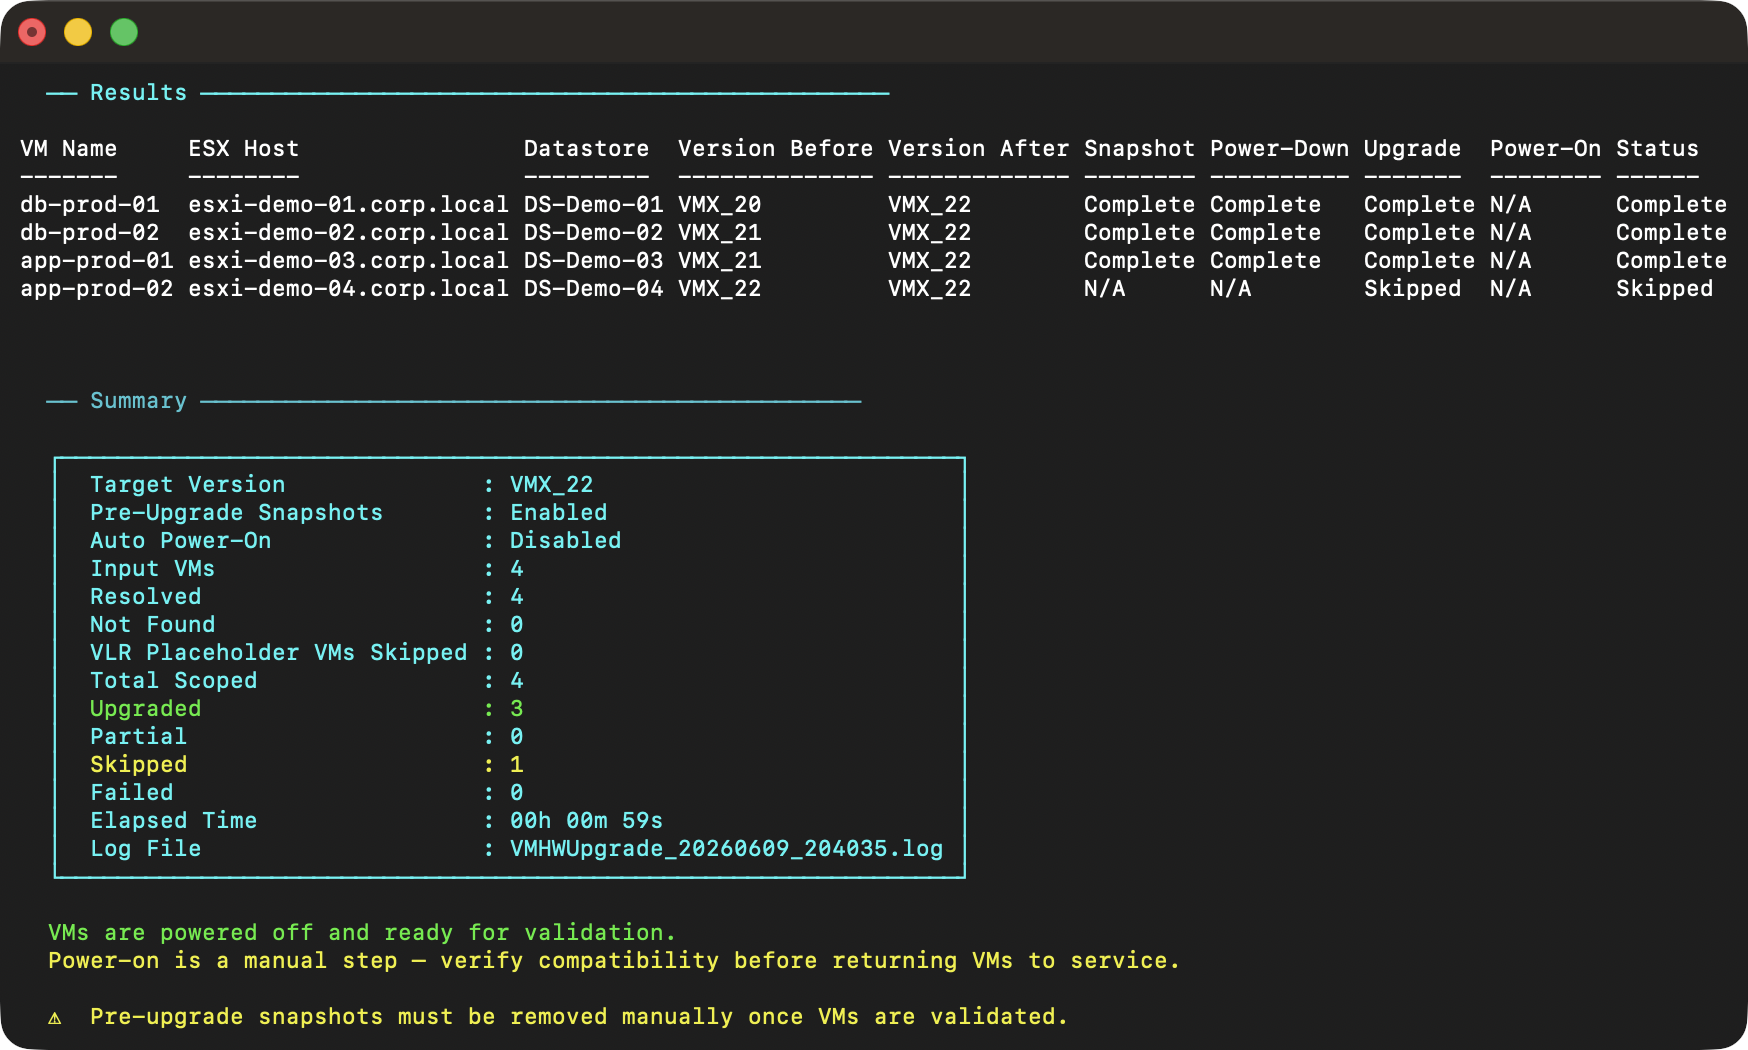
After power-down, snapshots are captured sequentially for each eligible VM, then the upgrade phase runs through each VM in sequence. The script verifies the new hardware version via a follow-up API query after each upgrade task completes.
Adding Auto Power-On
If you want VMs powered back on after the upgrade, add the -apo argument:
.\Invoke-VMHWUpgrade.ps1 -vc vcenter.corp.local -s vms.csv -tv VMX_22 -snap -apo -k -r CSVThis adds a fourth phase which powers on every VM the script shut down, using the same concurrency limits. VMs that were already powered off when the script started are not touched. The script only reverses what it did.
The Snapshot Safety-Net
Hardware version upgrades are permanent. There is no “undo” or “rollback” option. The pre-upgrade snapshot is the only rollback path, and it only exists if you took one.
The script takes the snapshot after the VM is powered off and before the upgrade command is sent. This is intentional. A snapshot on a powered-off VM is a clean, complete point-in-time copy of the disk state with no memory considerations. If an upgrade goes wrong or an application has compatibility issues with the new hardware version, you revert to the snapshot and the VM comes back exactly as it was.
A few things to know about how the snapshots work:
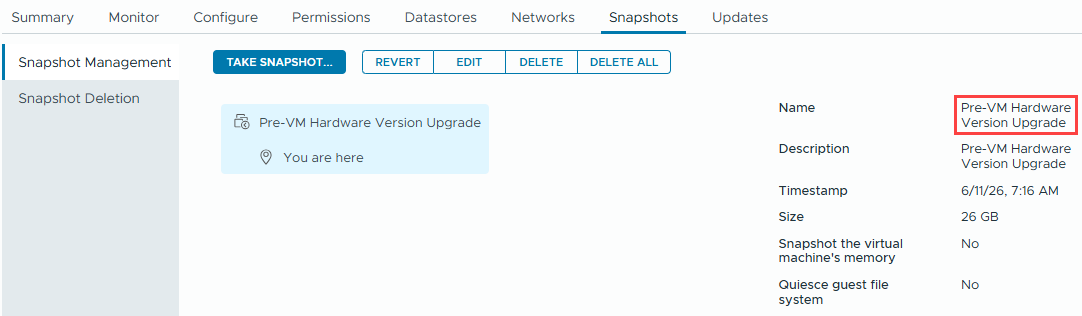
- Both the name and description are set to
Pre-VM Hardware Version Upgrade. This is what the cleanup mode uses to find them later. - Snapshots are crash-consistent; no capture of VM memory and no in-guest quiescing.
- If snapshot creation fails for a VM, that VM is excluded from the upgrade rather than proceeding without a safety net.
- Snapshots are not removed automatically. You are expected to validate first, then run the cleanup.
Cleaning Up Snapshots
Once you have validated that the upgraded VMs are healthy, it’s time to remove the pre-upgrade snapshots. Leaving them in place isn’t just a matter of housekeeping: snapshots consume storage and can affect performance over time.
The cleanup mode is intentionally a separate script execution. This gives you control over when the rollback safety net is removed. Run it when you feel confident:
# Preview what would be removed
.\Invoke-VMHWUpgrade.ps1 -vc vcenter.corp.local -s vms.csv -cs -k -d

# Remove the snapshots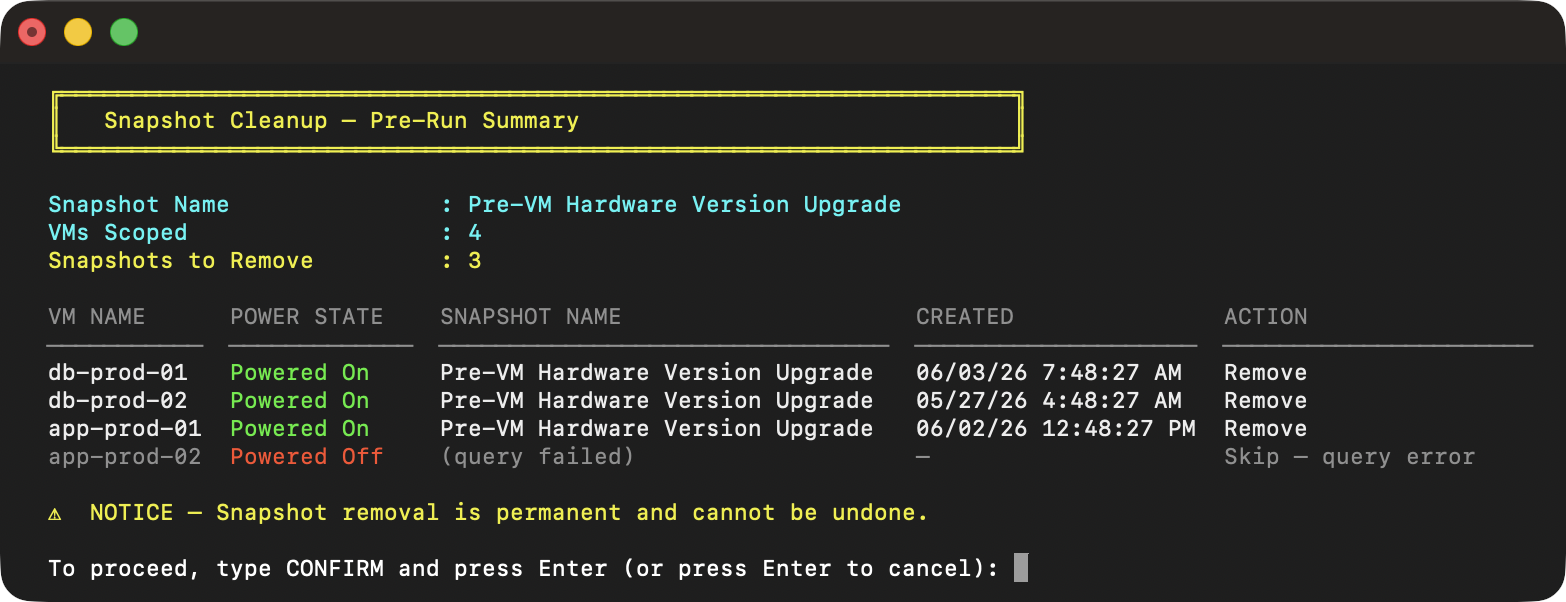
.\Invoke-VMHWUpgrade.ps1 -vc vcenter.corp.local -s vms.csv -cs -kBefore deleting anything, the script shows a pre-run summary table listing each VM, its power state, the matched snapshot name, and the creation timestamp. This information is designed to give you confidence, knowing exactly what you are about to remove. The user must then type CONFIRM before proceeding.
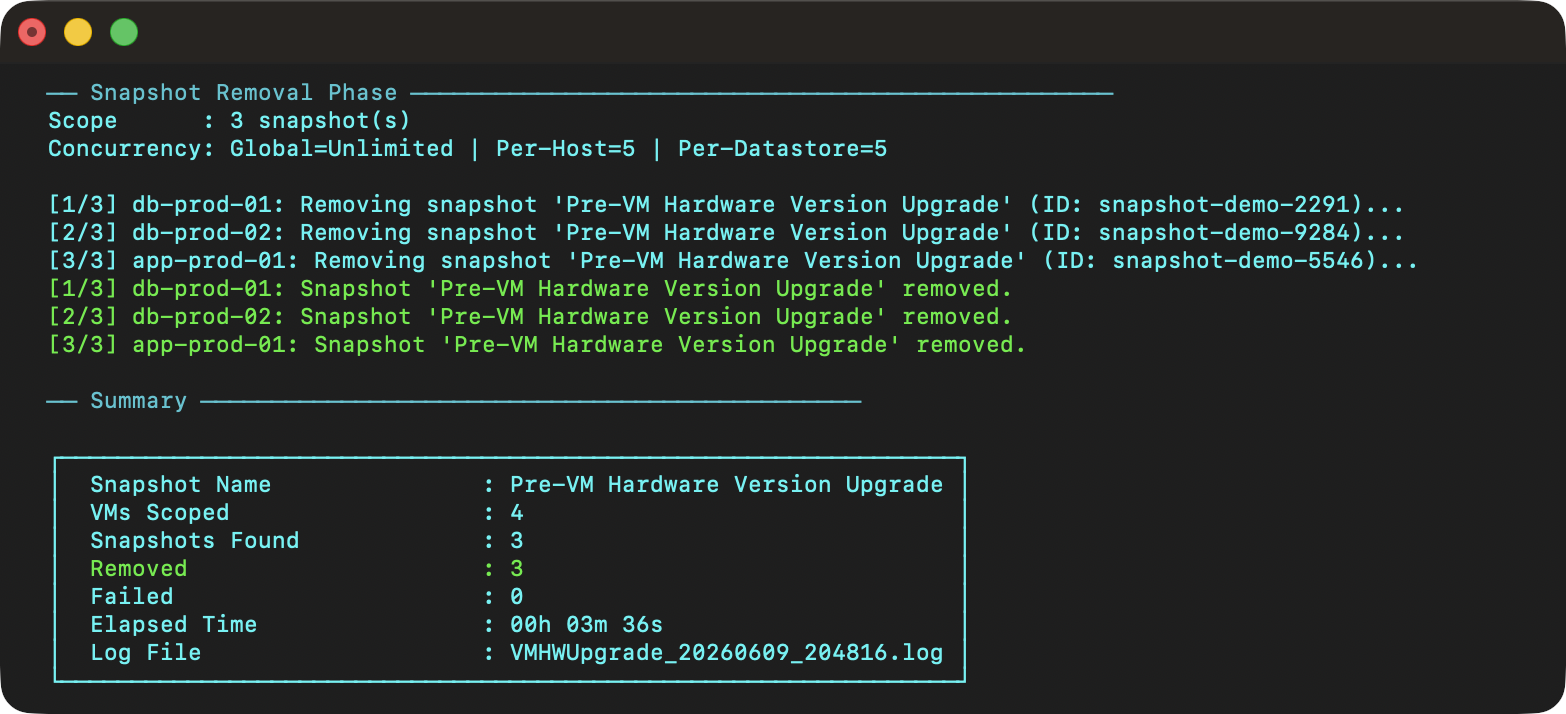
The removal phase runs concurrently under the same per-host and per-datastore limits as the power phases. Each removal task uses consolidate=true, so vSphere cleans up the snapshot delta files after removal.
The cleanup process is designed to be precise. The process only removes snapshots whose name exactly matches Pre-VM Hardware Version Upgrade. Any other snapshots on those VMs, regardless of name or age, are left untouched.
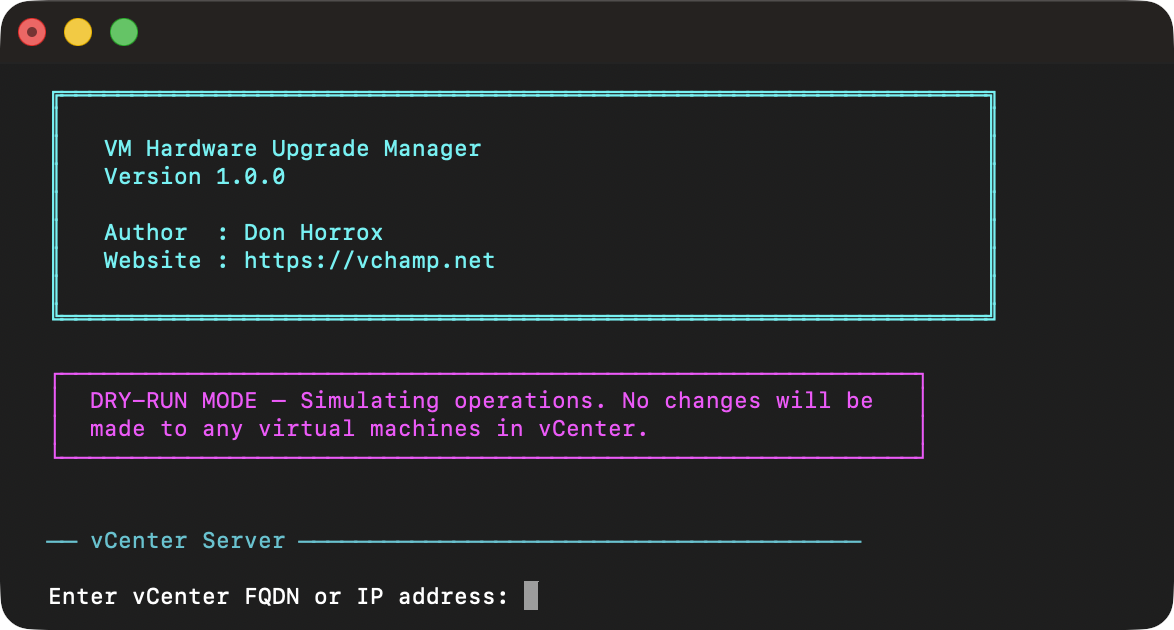
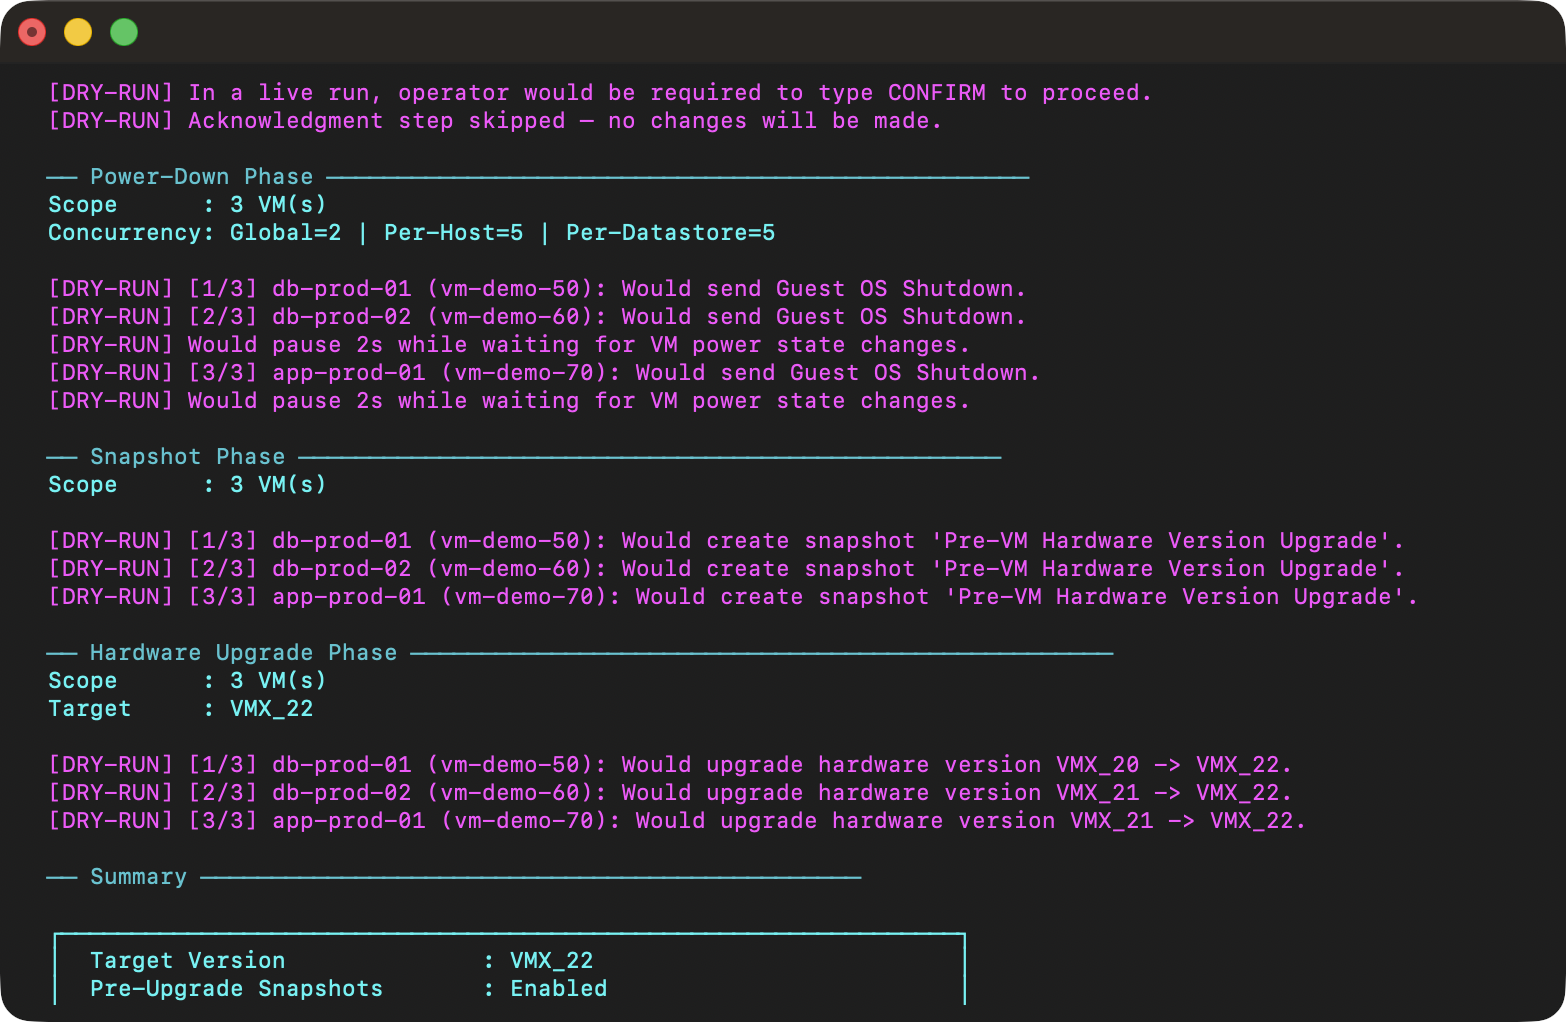
Staying Safe with Dry-Run Mode
Before committing any change to a production environment, run the script with the -d argument to simulate the full operation:
.\Invoke-VMHWUpgrade.ps1 -vc vcenter.corp.local -s vms.csv -tv VMX_22 -snap -k -dDry-run mode is not just a simulation of the logic. This process connects to your actual vCenter Server and resolves every VM in the input file for validation. You see the actual power states, current hardware versions, host placements, and which VMs would be skipped. The only thing that doesn’t happen is sending any commands. This means the pre-run summary you see in dry-run reflects exactly what a live run would encounter.
The VI/JSON release schema is also detected from your actual vCenter in dry-run mode, which means the snapshot inventory query during a -cs -d run shows you the real snapshots that would be removed, not merely a simulation.
Concurrency and Scale
The concurrent engine is one of the more important parts of the script if you are operating at scale. Three independent throttling gates control how many operations run simultaneously:
- Global (
-cg) — Caps the total number of concurrent operations across all hosts and datastores. - Per ESX Host (
-ch) — Limits operations per physical host (default: 5). - Per Datastore (
-cd) — Limits operations per parent datastore (default: 5).
A VM will not be dispatched unless all three gates pass. This prevents storage I/O spikes during bulk power-downs and snapshot operations, which is particularly important on spinning disk or stretched storage configurations.
For environments with fast NVMe or vSAN-backed datastores, you can increase the per-host and per-datastore limits aggressively. For shared SAN environments, conservative limits (-ch 3 -cd 3) are a safer starting point. The global cap is useful when you want to limit the total API request rate to vCenter regardless of how the work distributes across hosts.
The progress bar updates on each polling cycle and shows active, pending, and completed counts along with a rolling ETA:

Tips for Production Use
There are a few things worth keeping in mind before running this against production workloads:
Batch in maintenance windows. Hardware version upgrades require a power cycle, which means downtime. Coordinate with application owners and schedule accordingly. The script will not power VMs on or off outside of what you explicitly configure.
Use the -snap argument unless you have a compelling reason not to. Capturing the snapshot adds time but it’s your only rollback path. The separate cleanup mode makes removal easy after validation and is worth your time.
Test your VM list in dry-run first. Even with a well-maintained CMDB, VM names drift. A dry-run will tell you exactly which names resolved, which didn’t, and which are VLR/SRM placeholders, before you commit to anything.
Review the log. Every run writes a timestamped log file to the script directory. The log captures per-VM outcomes, escalation events, task IDs, and timing. It’s the definitive record of what happened during the upgrade and is useful for post-change documentation.
Start with a small batch. Even with dry-run validation, run the script against a handful of non-critical VMs the first time in your environment. Verify the upgrade results, check application behavior, then expand to broader batches once you feel comfortable.
Conclusion
Invoke-VMHWUpgrade.ps1 turns what would otherwise be a tedious, error-prone manual process into a repeatable, safe operation that scales to as many VMs as you need to upgrade. The full pipeline: power-down, snapshot, upgrade, verification, and optional power-on, runs with the kind of concurrency control and failure isolation that makes it practical for production environments. The separate cleanup mode gives you control over when the snapshot safety net is removed, and dry-run mode lets you validate scope and state against your actual vCenter before any change is committed.
Download the script from my GitHub repository, drop your VM names into a text file, and let it do the heavy lifting.
Note that this script is not actively maintained and offers no guarantee or warranty. Run this script at your own risk, as you would for any other obtained online. I highly recommend executing this script in a dedicated test/lab environment first and hope it helps make your life just a little bit easier!
Your Feedback Matters
If you found this article useful, please consider leaving a quick star rating below or leave a comment at the bottom of the page. Comments and suggestions are always appreciated and help guide future content for the virtualization and automation community.